News
  Found: 504 items      On view: 481 - 490
View on its own (if entry or VIDEO doesn't show)
From Keith
13-07-2020   (14:27:18)

The story of 2013
The 1/32nd scale scenic layout comes to an end
and I start to build a 1/43rd scale layout instead.
I also start to collect Jouef 1/40th scale cars


View on its own (if entry or VIDEO doesn't show)
From Keith
06-07-2020   (18:00:20)

April 2013
Track update
Rally In A Shed 2
As I have already said the 'water' in the main pond did not like the cold weather and did not set properly and split and lifted, it now also sees to have reacted with the paint on the pond base. Well it would seem to be a problem with the 'water' I have used as the small pond is now lifting and as it appears to have lifted the paint from the plaster I can only assume it has srunk in the cold.


rally in a shed 2 0789

rally in a shed 2 0790

rally in a shed 2 0791

rally in a shed 2 0792
Please click thumbs to expand


View on its own (if entry or VIDEO doesn't show)
From Keith
02-07-2020   (18:00:20)

May 2013
Track update
Rally In A Shed 2
This is as far as the track build got to. With the building of the 'Winter Layout' and the purchase of quite a few Jouef 1/40th scale cars this layout was not getting used. So I decided now was as good a time as any to end the track so the track is now dead and as of the end of May 2013 I have started to remove the track.

The new track will be a simple 1/40th scale two lane flat race track and will be called 'Westleigh Motor racing Circuit'.


View on its own (if entry or VIDEO doesn't show)
From Keith
10-06-2020   (18:00:20)

The story of 2012
More 1/32nd scale cars and I build a 1/32nd scale scenic layout.
I also try 1/43rd scale.


View on its own (if entry or VIDEO doesn't show)
From Keith
29-05-2020   (18:00:20)

January 2012
Track update


View on its own (if entry or VIDEO doesn't show)
From Keith
21-05-2020   (18:00:20)

March 2012
Track update
Rally In A Shed

Please click on the pictures to open and close.

In early March my Ninco rug track rally track came up and I cleared room in the shed to build a proper layout with the Ninco track, the layout was to be called Rally In A Shed.

This layout was started in March 2012.

Had my ninco track all layed out on the livingroom floor but this made it hard to get across with out stepping on the track. So it had to come up and move to the shed (no spare room to use).

So the shed is not that big and I'm restricted to a baseboard of about 5'6" by 3" (about 1650 x 900mm) not a lot of space to work with mad.gif . The original idea was to have 2 base boards on top of each other and then to run a level around the wall.

This is the framework for the main baseboard made using 2"x2" and 2"x1", the legs, front and back rails are 2"x2" whilst the cross members are 2"x1".

The base board was the covered with some old MDF shelving I had, the idea being to cover it with some 1/2" thick sundelar board (pinboard). The thought being that I can fix scenery items with short pins pressed into the board with no drilling needed. If I need to move something I just pull it up and reposition it. The resulting pin hole can be covered with a dab of paint etc.


rally in a shed 0001

rally in a shed 0002

rally in a shed 0003

rally in a shed 0004

rally in a shed 0005

rally in a shed 0006
It now became apparent that my idea of a lower level would not work as you would have to stand a long way back to see anything at all. So it looks like it will be baseboard then level 1 along back and right side and then level 2 along right side, back and left side with a loop at this point. the track is used with 2 roundabout loops (my original Ninco set being World Rally) so it will be single lane and I will get double the track length so the small space is not so bad.

This means I have to rethink the layout on the baseboard but I did cut 6mm MDF for the level 1 right hand side piece.There will be a hairpin at the end of this piece, from here the track will climb to level 2.I've kept the piece leading to the hairpin level at the moment but I think the climb up the back may be to steep and this part my have to have an inclimb.I am supporting the raised levels with shelf brackets so nothing needs to come up from the baseboard.Nr>
The level 2 boards will need a small frame made from 1"x1" and I have the option of placing cross peices above the shelf brackets or clamping the shelf brackets between the MDF and frame, this method will I think let me be more flexable the the MDF for sloops between levels.


rally in a shed 0007

rally in a shed 0008

rally in a shed 0009

rally in a shed 0010

rally in a shed 0011

rally in a shed 0012

Now its time to get Ultimate Racer out and design the track for the baseboard.

I tried out a possible layout for the baseboard the problem is to fit a reasonable amount of track and loop on the board

This is the first attempt and the left and right halves.


rally in a shed 0219

rally in a shed 0221

rally in a shed 0222

If I went with this the front left would probably be done as a tunnel and the drop over the loop as a bridge.

A small video of the track at this time


Had to take it easy as no barriers or borders and it's a long drop.

To paint the track I think I will try Plasticote Stone finish paint for the raised section of the track as this will be tarmac road and also for the normal track on the baseboard but in the light grey colour or even the pinkish one as this will be gavel road surface. But I need to paint the snow track I still want to keep it slippery as I intend to paint it brown / sand to represent mud/dirt track. As can be seen in the video at the moment it is way to slippery (I run most of my cars without magnets). I need to find a paint type available in the UK that will give the snow track some slip but will not have a glossy finish and will stick to the very smooth shiney plastic. I Think I may have to try some of the paint designed for respraying car bumpers as a primer.

I'm also hoping that a layer of primer and Plasticote will help reduce the rised hight of the rail in the Ninco track as I find that 2 of my cars, Revell Mk1 Cortina and SCX Mini, catch on the track in places as the have very little clearance (the Mini would not run untill I removed the magnet).

I think for the gravel areas I may put a little filler on the track so its not to smooth and may be the odd patch on the snow track.Tried out some different layouts on the base trackThis is test layout 2 (see above for test layout 1)


rally in a shed 0220

rally in a shed 0224


Testing the design


Then it was test layout 3 and finally test layout 4 & 5 (layout 4 has the snow track as 3)


rally in a shed 0225

rally in a shed 0226

rally in a shed 0227

rally in a shed 0228

rally in a shed 0229

rally in a shed 0230

rally in a shed 0232


and a small test of track 4


Ok so layout 1 was ok, layout 2 was better than 1 and a possible, layout 3 I found dull and simple Layout 4 was good but the snow track proved very difficault on the climb. But with the changes to layout 5 it was challenging and fun and with the 2 seperate bits of snow track in the climb its now very driveable.

So I am going with track 5 as I like the layout and the level changes. It doesn't show up well in the pictures but the turning loop is raised, more at the front than the back which also has adverse camber then flat until it will climb from front right till the first crossing which will be level then slow climb to the back left then level again, don't know just how I'm going to do the scenery at front left. All the rest of level 1 is flat, then the righthand side of level 2 climbs and levels out along the back. The back of level 2 probably won't stay straight. I'm thinking of cutting some track to give a single lane straight run at the rear with some single lane 'S' bends along the front.

Anyway the track is now all removed and the baseboard covered with polystyrene sheet 1" thick, a change due to stock availablity and cost. I can also use the polystyrene to make supports for raising the track. I have also fitted the support brackets for the rear track of level 1.

My idea is still to paint the snow track as mud / dirt and all the normal track till the first bridge / crossing as gravel then all other track as road / tarmac.I need to try and get as much done tomorrow as possible as I'm back to work next week and that will slow things down (Holiday this week).

I've glued part of the polystyrene on to the baseboard, only part as I forgot about glue and used just what I could find. Won't be getting any glue till I'm back at work, I get it cheap as I work in builders merchants, so I'm not paying DIY shed prices for it. Anyway I layed out the lefthand side of the track and set the levels then connected up some power and it seemed ok. All the supporting polystyrene to be glued during the coming week.

I the marked out and cut some 6mm MDF for the section that rises from the back right to the first level. Installed the track and tested it with a few cars.


rally in a shed 0020

rally in a shed 0024

rally in a shed 0022

rally in a shed 0023

rally in a shed 0021


To make testing easier I installed the second loop at the end of level 1 on the right and here are some videos of the testing, also used the Revell Mk1 Cortina, SCX Mini and Pioneer Mustang. Was going to film my Power Slot Polo but this was the first casualty as it left the track at front and broke the guide when it hit the floor. For this reason I'm taking it easy in the videos.


One problem that may need a rethink is the most of the loop and also the snow track is hidden from view when standing near the track. The is not so obvious from the videos as they are taken lower down but can be seen in the photos. this is also probably the hardest part of the track to drive. As can also be seen in the videos there is a problem the some cars catching on the track at the back at one of the joins. This is a problem I have found with some Ninco track sections where the rail is higher in one piece than the other.

Anyway I will try and see what it's like if I'm seated when driving or I might have to revert to layout 3 (see above).

The more I thought about it the more layout 5 becomes unusable due to lots of the track being hidden. I know I changed the layout slightly but with the supporting board in place for the raised section I don't think that will make much difference and I prefer the straight section in the climb and for the bridge.

So I'm going to go with layout 3 but will try some raised sections in it, may be at the left rear and that corner is going to need blocking off as I can't reach past the track into the corner.Anyway will test it and see what I think.

Major changes, reverted to layout 3 but with the snow track in different places as per photos


rally in a shed 0025

rally in a shed 0026

rally in a shed 0027

rally in a shed 0028

rally in a shed 0029

rally in a shed 0030

rally in a shed 0031

rally in a shed 0032

rally in a shed 0033

rally in a shed 0034


As you can see I've been playing about with the levels to add a bit more interest, biggest problem was getting enough clearance for the crossover. I wanted to raise the loop but this left very little clearance. May try with some corrugated card or MDF under the loop just to raise it a bit or may have to revert to the original curved raised part for the crossover (but that will mean recutting the MDF). I may be able to cut and join what I've already used if I go that way.

Also it looks like I will need to find a way to fix the track in place, probably glue it down in certain places as I don't think MDF as borders and plastered over will keep the track in place at some of the level changes.


View on its own (if entry or VIDEO doesn't show)
From Keith
19-05-2020   (18:00:20)

April 2012
Track update
Rally In A Shed

Please click on pictures to open and close.

I've decided to end the Rally In A Shed layout at this point in early April 2012.

In reality none of the layouts tried worked for various reasons...

Layout 5 (the best of the 3 to drive) because to much track was hidden from view.
Layout 1 to simple.
Layout 2 going in front of the window I think would have been a problem with heat and the sun.

So instead I'm going to start Rally In A Shed 2.
Track update
Rally In A Shed 2
By mid April I had given up on using Ninco track and started a new layout called Rally In A Shed 2 which was to use Artin track.

Assuming you have read the March track up date above you will know that I'd been trying to design a rally circuit in a small area (5' x 3' base plus raised back and sides). Having tried out about 6 or 7 different layouts it became obvious that trying to use 1/32nd plastic track in this space was not going to work. Also the raised rails of the Ninco track caused problems as some of my cars bottomed out at the top of climbs, my Revell Mk1 Cortina and SCX Mini being the main problem, you can see this in some of the videos. (The SCX mini would not even run on the Ninco track until the magnet was removed as it was so close to the rails).

So I needed to find a solution and a routed track would be the best answer. However having just got back in to slot cars I did not want to go this route yet as I'm sure any track I design will have faults and problems and need changes made to it to make it work and flow.

Then I had a brain wave (this is normally quite dangerous as it involves lots of steam coming from the ears and the very loud sound of well warn cogs grinding) while I was running the SCX Mini on my Carrera Go track. I don't need a full width 1/32 scale track as the full circuit will be run as a single lane, either with a turning loop at each end or a single crossover so I run on both lanes. I will be the only person using the track with a single car in use so in theory the lanes can be close together, I could build the whole circuit out of chicane pieces and it wouldn't effect my use of it.

I tried some of my other cars on the Carrera track and the only "problems" I found were that the straights need to be slightly wider and you need a good size border area on the outside of the corners and a small border on the inside. So I laid out a test track in the shed, the Carrera track I have only has 90 deg bends so the layout was restricted but I got about 7mtrs of track laid on the 5x3 baseboard and was able to try a few things out.

I made a border area on the outside of a 180 bend and tried various barriers on other bends, Ninco, Scalextric and SCX and the Carrera Go things. In all cases the barrier clips caused a problem on the inside of bends and wider cars got court on the inner barriers. On the outside of the bends most of the barriers worked but the SCX was best (the type I have is long and quite rigid). This did prove however that track would need a border of some sort all round. The border area I made worked fine.


rally in a shed 0035

rally in a shed 0036


So the idea now is to design a circuit with 1/43 scale track and widen as required via the scenery. I decided that I needed a track with 45 deg bends and probably something cheap that I would also be happy to cut about and glue together (for single lane turning loops filling gaps or making peices meet) so I took a look at Artin track. However there doesn't seem to be a lot of Artin track about in the UK until I realised that Woolworth used to sell it and so do Argos as Chad Valley R-ace and Argo used to call it Mega Slot before they owned Chad Valley. So I've purchased 2 lots of Chad Valley (both with cars) a large set of Mega slot and some Artin. This is all very cheap, postage being more than the track. the large Mega Slot set was 99p. Still waiting for most of it to arrive (good old second class Royal mail parcel post) so I can't start designing yet till I know what track I've got. The Chad Valley is definatly Artin as the instruction leaflet says Chad Valley on the front and Artin inside.

As I said in part 1 I intend to paint the track so the finish of the track is not important and all those yellow markings you see on Artin track will disappear under the paint. I still intend to run on 2 levels and possibly cut some track to have some single lane sections and I should be able to get a fair amount of track in a fun a usable layout.

Had a delivery of track -I thought I was getting one set (Drifting Express) but in fact it appears to be two sets. This is what I received:

11 x straights (1 of which is broken)
1 x half straight
44 x R1 curves (some with yellow bands)
4 x R2 curves
1 x Chicane (3 pieces of track)
2 x power connector straights
1 x lap counter
1 x drift bend set (4 bends which I think are R1 but with an extra unpowered slot)
1 x hump back section (2 short up curves and the hump, which is broken)
2 x power units
4 x controllers
lots of bridge supports


(This little lot cost all of £10.99 inc postage, 99p auction win, and it cost the guy £10.43 to post - now that is ebay madness!!)

I've also got a basic figure of 8 set, 12 x R1 curves and 4 x straights.

Also got the following Artin track coming (by the weekend hopefully):
7 x straights, 1 x lapcounter, 2 x crossover straights, 8 x curves plus power unit and 2 more controllers and other bits.

And if it ever arrives a twister chase set with 2 cars (Mini and Ferrari bodies)- this has been in the post since easter!

Went for the artin set as I wanted the crossover pieces, I will need one if I don't make turning loops for each end and if I do I might try to make a double turning loop at each end.

Received even more track so to the above list I can add

8 x R1 curves
7 x straights
2 x Crossover straights
1 x Power straight
1 x Lap counter
plus power supply and 2 controllers

Those who read part 1 will know that my original Ninco layout was going to be on 2 or 3 levels with a Rally Loop at each end. From the base board the track climbed up on the left then went along the back and around the right hand side. From here the idea was to rise again on the right and travel along the back to the 2nd rally loop. For the moment using the Artin track I am staying on the baseboard with an extension piece on each side. No loops the track is continuous with a single crossover piece so a single lap is twice around just over 19mtrs.


rally in a shed 0233


Going from the power conector straight (middle right) [gravel] and clockwise (down) as you come out the 180 the track will slowly climb, level through 180 and then slow climb, leveling off after short straight [gravel turning to earth/mud]. Staying level the next straight will climb [tarmac], flat 90 and then climb to the chicane which will be level staying level until the top straight which will drop down to the base level [180 earth/mud leading to gravel by crossover]

Track has been laid and tested, all seems to be OK.


rally in a shed 0043

rally in a shed 0044

rally in a shed 0039

rally in a shed 0042

rally in a shed 0046

rally in a shed 0038

rally in a shed 0045

rally in a shed 0040

rally in a shed 0041


The layout seems to drive quite nice in an anticlockwise direction and hopefully will be ok clockwise. The elevation levels also seem ok. Most of my cars seem to like it although the Artin track has a lot less grip than the Ninco but as it's going to be painted the grip should hopfully improve.

Made a small change to the track layout :-


rally in a shed 0234


I've removed the straight and crossover from the return loop at the top right of the track and 2 curves as it comes back to the front straight. This has made room to insert 4 straights in to the middle loop section. This has removed the overlap at the end of the middle loop and made the track slightly longer at approx 19.5mtrs.

In the above drawing the black is tarmac, grey is gravel and brown is earth/mud, this is how I hope to paint the track. The idea is also to paint scenery roads going on to the right at the top right (track leaves road going on to mud track either field or forest section) and also scenery road going srtaight up at the top of middle loop where mud joins tarmac and going into tunnel or under bridge.

Looks like I'm going to have to solder some of the track joints as this layout does not quite join up and the track is losing contact in places.

Still playing with elevation levels but the lefthand straight is the highest point. The short straight at the bottom my or may not drop down, the track is the more or less level untill the 2 straight in the middle loop which both decend with the rest of the track more or less flat. I am trying to keep all the bends level if I can.

A small video showing a..
Carrera Go Mini Cooper
SCX Mini
Revell Cortina
Pioneer Mustang
SCX Compact McLaren F1
while testing the track with all cars running with an Artin 7.5 volt power pack and the GO and Compact cars still with magnets.


A couple of photos of the changes made to the layout and the layout diagram. This leaves me with one problem, if you look at the diagram the road would appear to continue of the right at top and the same going straight on up and under the top straight from the centre loop. However as show in the first two photos at this point the loop and raising track are almost at the same level. So I have tried a small change to the level of the long straight which will leave me able to have a tunnel or bridge at that point still. This does however give quite a steep climb which on the Artin track is to steep. Question is will the Plasticote paint give enough extra grip?

Next job is to wire up my adjustable power supply which will also let me reverse the power and test the track going the other way.


rally in a shed 0047

rally in a shed 0048

rally in a shed 0049

rally in a shed 0235

rally in a shed 0050

rally in a shed 0051


Decided to reduce the elevation height again at the back of the track as the climb on the righthand side was way to steep in the end. I had one car, Autoart Evo, sliding back down the slope. Also changed the elevation levels slightly on the left of the track.

Also had to lower the entry to the central loop so I can still have a tunnel or bridge for the false road to run to.

And the Artin Drift curves have got to go (thats the loop on the left with the built in external kerb. This track has 2 extra unpowered slots with the entry controlled by the passing of the car (only works with a pin). As the car passes the entry point the guide pin moves a divider that next time round diverts the car to the unpowered slot and the closes the slot split. So the car alternates between the powered and unpowered slots, which is not what I require. Also you can't reverse track direction as all cars run straight into the unpowered slot. I tried removing the moving wedge and trimming the activating pins off but the is to loose. So it looks like I will keep the 2 middle curves and bin the entry and exit curves.


rally in a shed 0057

rally in a shed 0054

rally in a shed 0052

rally in a shed 0055

rally in a shed 0056

rally in a shed 0053
View on its own (if entry or VIDEO doesn't show)
From Keith
17-05-2020   (18:00:20)

May 2012
Track update
Rally In A Shed 2
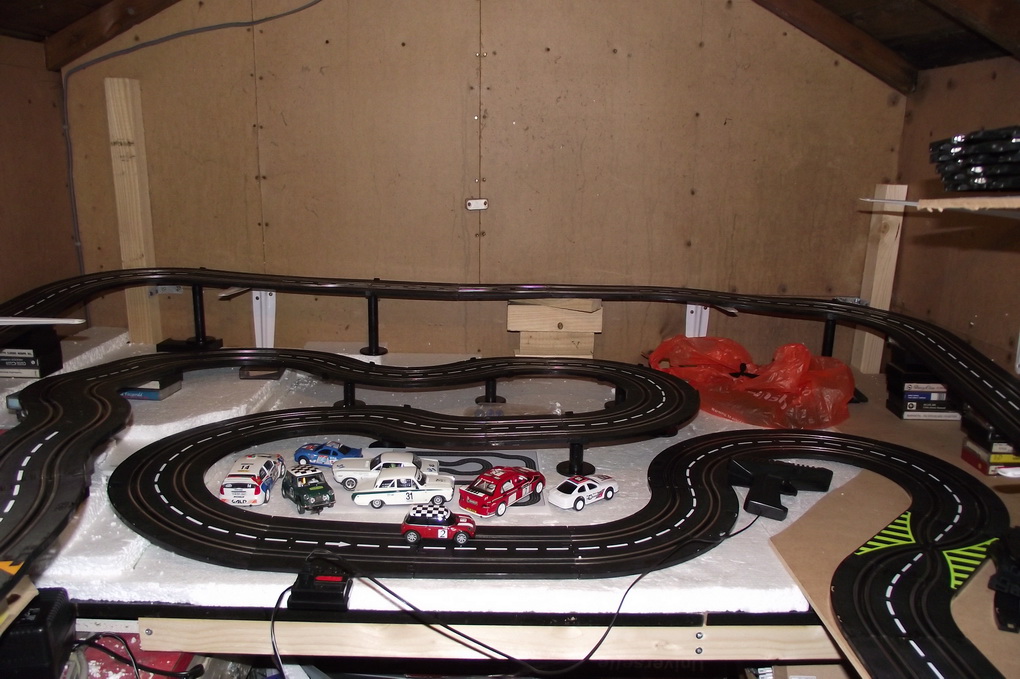
Got an early birthday present a Chad Valley (Artin) crash 'n Go set this is an elongated figure eight with a banked 180 and crossover section and two Mini Coopers. So the idea was to try a layout with a crossroads junction in it.

I had to change the righthand loop to get to the crossroad in, and the center piece is just a simple oval connected to two arms of the crossover and the only other change as above is the removal of the entry and exit of the drift curve.


rally in a shed 0058

rally in a shed 0059

rally in a shed 0060

rally in a shed 0061

rally in a shed 0062

rally in a shed 0063

rally in a shed 0064

rally in a shed 0065

rally in a shed 0066

rally in a shed 0067

rally in a shed 0068

rally in a shed 0069

rally in a shed 0070

rally in a shed 0071

rally in a shed 0072

rally in a shed 0073

rally in a shed 0236
Please click thumbs to expand


This runs fine when taking the centre loop clockwise but is not so good in the other direction.

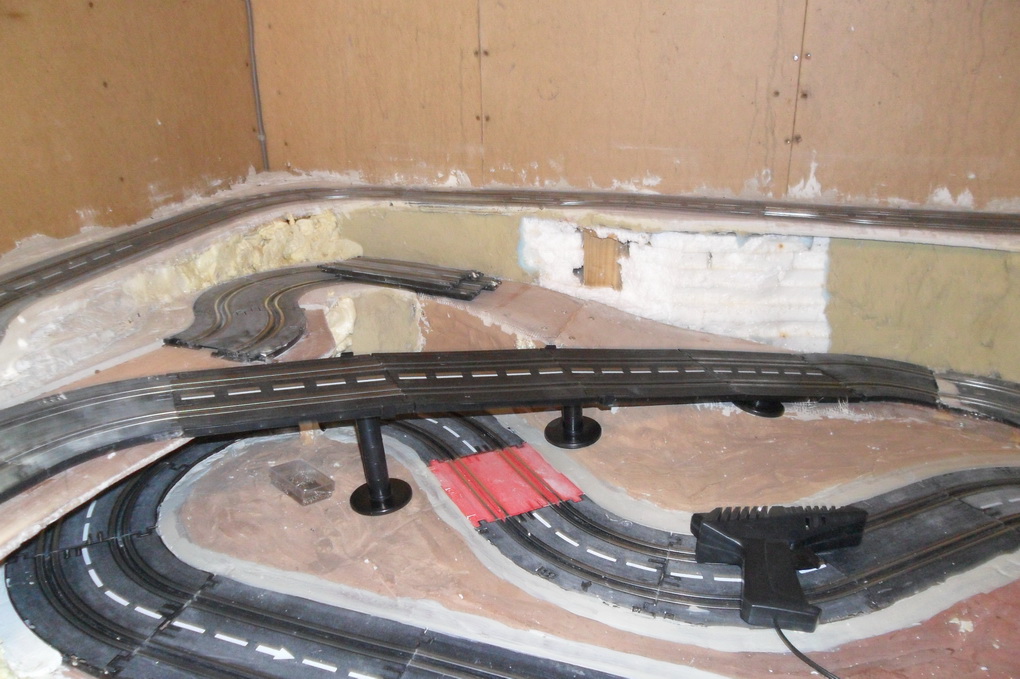
Next I tried a change with the crossover moved to the righthand edge of the centre board. This meant changing the track on the right going to the crossover. the climb in the centre section and the centre loop which I change the shape of to make it more interesting.


rally in a shed 0237

rally in a shed 0075

rally in a shed 0077

rally in a shed 0078

rally in a shed 0079

rally in a shed 0080

rally in a shed 0081

rally in a shed 0082

rally in a shed 0083

rally in a shed 0084

rally in a shed 0085
Please click thumbs to expand


Although the new design runs well in both directions it did not leave a lot of room for any scenery between the centre climb and the rear raised section and I need to build come cliff face here. So I have added a small kink in the climb so the cliffs can have a bit of shape.

This will be the final layout..


rally in a shed 0238

rally in a shed 0086

rally in a shed 0087

rally in a shed 0088

rally in a shed 0239
Please click thumbs to expand


Next job will be cutting some thin plywood to support the track and building the track supports. Then it will be time to start the scenery, first thing to do will be to widen the track. All curves will have a border around the outside and a small edge border on the inside. the straights will be a mixture of edge border and armaco barrier or some sort of wall or fence. Thinking of putting a few ditches in place to enforce a bit of car control.The last drawing above shows my basic thoughts. Three scenery road extensions and gravel and earth/mud sections. The area were the chicane is will be finished in gloss varnish over the painted tarmac to represent a wet section of road and hopefully let the cars slide a bit. Grass or earth and tree infilled areas. At this point it was my intension to use both 1/32 and 1/43 scale cars so there would be no scaled scenery items such as buildings, people or vehicles. As I'd never done anything like this before I had decided to keep things simple.

Plywood marked out for cutting using the track as a template. The ply ended up being cut from three separate pieces which would cause a problem later on.

The elevated sections are supported by pieces of 2"x1" and 2"x2" timber with the plywood screwed to them. The joints have some 4"x1" under them with the ply glued and screwed.

Due to the position of some supports the middle section of the track has changed slightly. The short and full straights have been swapped over. The straight under the raised section has also gone and the front straight is slightly longer.


rally in a shed 0096

rally in a shed 0240

rally in a shed 0092

rally in a shed 0093

rally in a shed 0094

rally in a shed 0095

rally in a shed 0241
Please click thumbs to expand


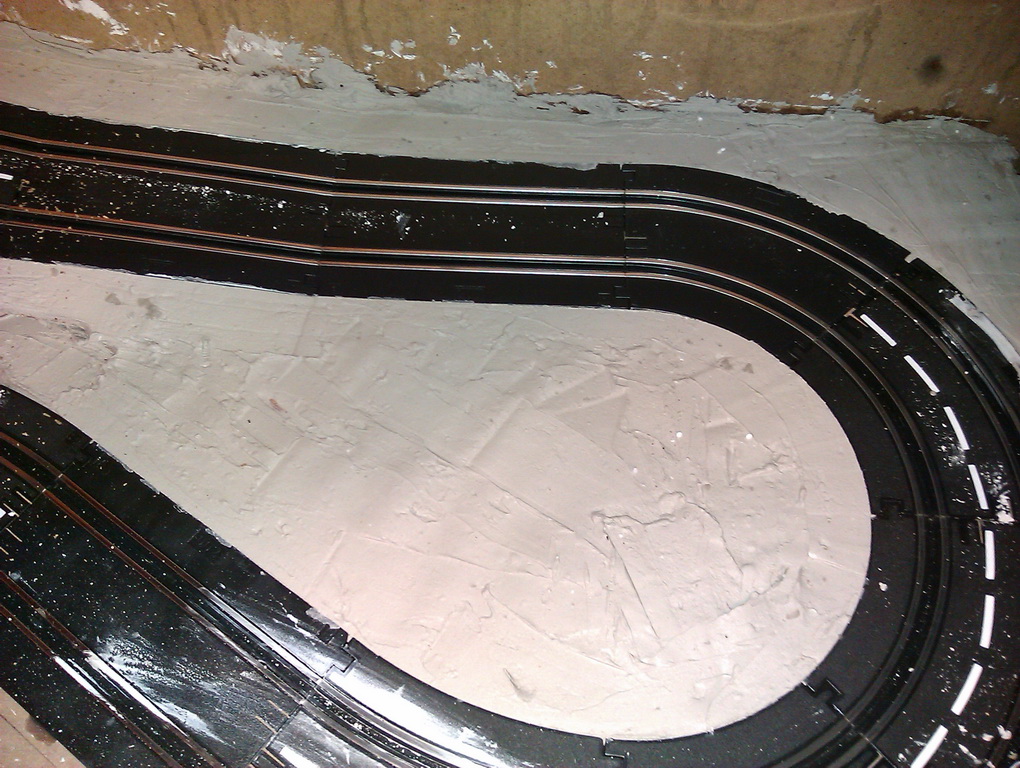
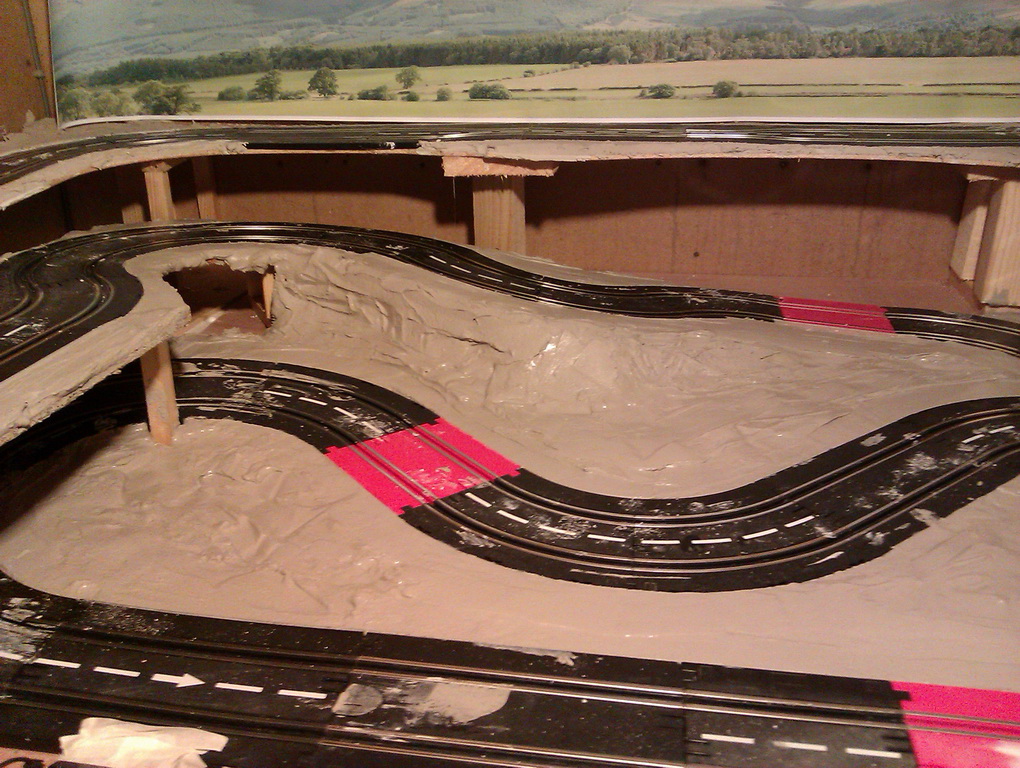
Next job was to glue the track down to the plywood. This was done by spot gluing at the track joints and anywhere the track was not flush to the plywood, used about 5 hot glue sticks. Then masked off the edges of the track and mixed up my dry-wall adhesive. Then I started to build up the edges of the track, trying to keep it fairly smooth at the track edge. As you can see in the photos there is not a lot of room around the raised section at the back of the layout. The corner at top right will be built up to stop any cars going to far off track as this corner is not very easy to reach with out laying on the track. The plaster will be smoothed off to make it appear the the road continues straight on at both of the loops. There is also a raised area inside the left hand loop.


rally in a shed 0105

rally in a shed 0106

rally in a shed 0121

rally in a shed 0103

rally in a shed 0107

rally in a shed 0108

rally in a shed 0109

rally in a shed 0110

rally in a shed 0111

rally in a shed 0112

rally in a shed 0113

rally in a shed 0114

rally in a shed 0120
Please click thumbs to expand


Finished the basic plastering and now will need to sand the track borders smooth and do some fine filling.


rally in a shed 0131

rally in a shed 0132

rally in a shed 0133

rally in a shed 0134

rally in a shed 0135
Please click thumbs to expand


I bought a couple of scenic railway borders and this is the main one for the back of the layout being tested before the plastering was done and the in place afterwards.


rally in a shed 0130

rally in a shed 0129

rally in a shed 0128

rally in a shed 0126
Please click thumbs to expand


For both of the loops where the track turns of the "road" I need a barrier of some sort which will also act as a catch fence to stop the cars falling of the baseboard. So I thought I would put up some orange barrier fencing, the type you see around roadworks and on building sites. I need to get some orange paint but here's the idea..


rally in a shed 0136

rally in a shed 0137
Please click thumbs to expand


The posts are each a 1/3 of a BBQ skewer and the fence is self adhesive plasterboard scrim. Just hope it looks ok once painted.

All the plaster around the track as been sanded. One thing I now know is that the wetter the drywall adhesive is mixed the harder it is to sand afterwards. The first batch of drywall adhesive I mixed wasn't that wet and was easy to sand with normal coarse and medium sanding blocks. The second batch was really a bit to wet and was very hard to sand and I ended up using a very coarse (32 grit) sanding block.

Havig sanded the left side of the track I decided to fill the imperfections with fine surface filler. This also proved to be much harder than the adhesive and also did not adhere to the drywall very well.

Also had to grind part of the track at the top of the righthand climb as cars were catching on the top edge of the rails. first photo. Also had the grind the bottom of the guide slot in a couple of places, one were there was a slight gap between the pieces and in the middle of the middle section climb. I think the rails on one side of the track had lifted slightly so the slot bases did not meet level.I've also had a go at some Frock, don't know if I like it but will see what it's like when plastered and painted.


rally in a shed 0138

rally in a shed 0139

rally in a shed 0140

rally in a shed 0141

rally in a shed 0142

rally in a shed 0143

rally in a shed 0144

rally in a shed 0145

rally in a shed 0146

rally in a shed 0147
Please click thumbs to expand


It was at this point that I gave the track a name..

The Shadphite Stage (pronounced Shedfit). Although to be honest I never really used it.

Had my first go at Frock, probably being my first attempt or the type of foam I had or even a sore thumb that I couldn't put any pressure on, I couldn't tear the foam into thin strips. All I was getting was small thin pieces with holes in them or thick lengths and the face was very coarse. I really needed a smoothish face and thin strips, as in a lot of places the cliffs will be right next to the track (a good test of driving skill not to slide to much). Anyway I removed all the first lot of foam and cut some more.

This time it was cut with a long bread knife which gave a sawtooth effect finish and changed with the direction of cut as the knife didn't quite reach through the foam.


rally in a shed 0159

rally in a shed 0162

rally in a shed 0160

rally in a shed 0164

rally in a shed 0161

rally in a shed 0163

rally in a shed 0158

rally in a shed 0165

rally in a shed 0166
Please click thumbs to expand


The first three photos show the sawtooth effect from the bread knife.
The third photo also shows how close the track is to the foam in places.
The next photo shows what will be a tunnel entrance with the road running in to it.
The but one photo shows the track under the over hang.
While the last photo show who I had to cut away the back of the support post here as for some reason the Polo and Corolla would not go past it without deslotting, everything else got by ok.

At the moment I have only glued the bottom of the foam, thought I would let this set before I fix the top.

So while I was letting the glue dry I got out some of my old modelling acrylic paints out and did some brown painting. The unpainted areas next to the track will become part of the track when the final painting is done.

My first try at gluing the foam in place was with PVA and I think it would have worked better if I had first sealed the foam and plaster with the PVA and then glued it. Second attempt was with solvent free grab adhesive, better known as liquid nails, and may be it's down to the chilly weather here and lack of heat in the shed but it didn't really stick to the foam or plaster, again I think I should have sealed the plaster first, see the third photo above.

As I feared foam to close to the track in one spot. The 2 pieces in the middle against the curve ( see third photo above again) have been removed as the wider cars hit it. My Mustang just made contact but at speed was deslotted by the contact and the VW Polo and Toyota Corolla both got stuck against the foam. Can't just move the foam back a bit as there is nothing behind the track just a deep void. Going to see if I can get some more foam off cuts from the foam supplier and fill the void with foam to the bottom of the tack support ply then place some ply or MDF on this and the place the foam further back.

Another little problem in the same place is where the climb in the track levels off in front of this section the outside lane has an open joint and when going down the slope there is a ridge as the track sections are not level. Looks like I am going to have to get the dremil out and do some more grinding. Hope I don't cause any electrical problems here.

Electrical is another problem and I am thinking I may have to copper tape over the rails. The rails in the Artin track are narrower than 1/32nd track and I am finding I have to be very careful how I position the braids with most of the cars or they will just stop on parts of the track. Then I have to adjust the braids again till they run ok. It seams the narrower the braids the more problems as these seam to move more same as when the Artin cars spin and twist the braids.

I've cut and glued lots of polystyrene in the voids behind the track. Don't know if it's the cool weather or just bad grab adhesive but it took ages to set and the is very brittle. If you flex the foam it snaps.

The polystyrene has all been glued in place with PVA so needs time to fully dry then I'm going to use PVA to fix the foam in place. If I coat both surfaces with the PVA and let it go tacky it will the act like a contact adhesive and grab better. I'll then pin the foam to the polystyrene until the PVA has fully dried.

As to my little problem area under the overhang I decided to spray foam the back of the track, need another can of foam but this is what I have so far. All backed with some more polystyrene.


rally in a shed 0177

rally in a shed 0178

rally in a shed 0179

rally in a shed 0180

rally in a shed 0181

rally in a shed 0182

rally in a shed 0183
Please click thumbs to expand


I have cut the foam back under the overhang and when testing the clearance found a major problem. When I left the track I thought as the foam had skinned it was fully expanded but looks like I was wrong. It was still expanding under the track and had lifted the outside edge of this curved piece as you can see brlow. A quick test drive proved it was undrivable. The angle of the track was lifting and deslotting all cars in both scales. My first thought was to try and remove the foam from under the track but to do so I think I would have had to remove most of the foam as well. I then decided to cut away the raised piece of track just to the rail and fill the hole with plaster or resin. Having removed the outer plastic section from the curve I then found that the outer rail has also lifted. The track had bent in the outer slot so I cut through all four rails at both ends and removed the whole piece of track. I then had to remove the pieces either side and to make refitting easier I removed a fourth curve. With the track removed I was able to remove the foam and cut it down around the edge of the track. Then I laid new track which is now a lot flatter than before. The gap between track and foam will be filled with plaster and sanded flat as per the rest of the track.


rally in a shed 0194

rally in a shed 0195

rally in a shed 0196

rally in a shed 0197

rally in a shed 0198

rally in a shed 0200

rally in a shed 0201

rally in a shed 0202

rally in a shed 0203

rally in a shed 0204

rally in a shed 0206
Please click thumbs to expand


Then it was on to the frock along the back of the track. I cut the existing foam into thin pieces and the glued it in place with PVA applied to the foam and polystyrene. I the used dressmaking pins to pin the foam back against the polystyrene. The little dark spots in the foam are the pin heads. I will have to wait and see how well the joins in the foam work and disappear.


rally in a shed 0207

rally in a shed 0208

rally in a shed 0209

rally in a shed 0210

rally in a shed 0211
Please click thumbs to expand


I also did a lot more grinding of track and rail in the same two places as before, top of the righthand rise and in the middle of the back bends. The middle section is just about ok now but the top of the righthand rise is still way to sharp. It needs to be taken slowly but some cars still deslot going up and some when going slowly bottom out on the track. Some cars also don't like going down either. One thing I have found is that different front axle arrangements effect how the cars behave on different parts of the track. Those with a floating front axle appear to take the cambered sections better but don't take the top of the righthand rise so well when going up compared the cars with a rigid front axle.

Filled the gap between the new track pieces and the foam with filler. I used a fine surface filler as it gives a much smoother finish than the dry wall adhesive, however I have taken a gamble with it as it should only be used upto about 2mm thick. I just hope it sets ok. If you look closely at the inside of the bend you can see that I could not get the track to sit as low as before and there is now a drop from track to infill. I don't think this will cause a problem as the inside track has to be taken a speed to slide the car around to miss the wooden support even after removing some of it as you can see in the photo.


rally in a shed 0213

rally in a shed 0214

rally in a shed 0216

rally in a shed 0217

rally in a shed 0218
Please click thumbs to expand

View on its own (if entry or VIDEO doesn't show)
From Keith
17-05-2020   (18:00:20)

June 2012
Track update
Rally In A Shed 2

Please click on pictures to open and close.

The more I thought about it the more I know that the right hand side of the track just was not working. The change from climb to flat and vise versa is just to sharp so I have decided on some major surgery. The idea is to remove some plaster from the top and bottom of the slope and all the way around to the crossover. Then I can remove the glue lift the bottom of the current climb and raise all the track from the crossover back to the current climb. A lot of work but hopefully it will be worth it. I have a feeling that I will also have to remove all the plaster on the slope to get the climb here much more gentel at the top.

I bit the bullet and attacked the track with hammer and chisel. So now the right hand side of the track now has no plaster. Most of the track came up ok but I will have to replace a couple of straights.

After some cutting of the plywood ramp and playing with levels the photos below show what I came up with. Don't know if it's because the Artin track if very rigid or because the straights a not that long but I found that I needed two level straight before the corner or some cars still deslot to easy. This time I won't force the track to follow the shape of the ply but will use packing pieces so the track follows it's own shape. The only thing I do want to try and get is a small camber on the 180 bend. I will also probably run the ply just into the shelf unit to have a bit more room on the outside of the bend.

I have now removed the right hand section of the track and reworked the decent on this side. The idea being to to cut a new plywood section to support the track. To this end I had cut the original plywood at the base of the climb the new ply would be fixed to this and the baseboard near the crossing. having cut the ply I then started to encounter some problems the biggest one being the joint between the new pieces of ply. The solution was to unscrewed the baseboard and removed an oval shape from the centre and made a cut towards the crossing. Then I had to joint the ply together again but it wouldn't fit, I had to cut about 10-12mm away before I could join it back together.

The Artin track and 6mm MDF are both the same thickness so I have tried a little experiment with MDF borders. I Think I will keep the outer boarded as it gives a wider edge to the track but the inner one may go as I think it is not helping with the track joint.

The track has now been tried with most of my cars and going up the climb the all appear to be fine and they all get down ok as well.


rally in a shed 0242

rally in a shed 0243

rally in a shed 0244

rally in a shed 0245

rally in a shed 0246

rally in a shed 0247

rally in a shed 0248

rally in a shed 0249

rally in a shed 0250

rally in a shed 0251

rally in a shed 0252

rally in a shed 0253

rally in a shed 0254

rally in a shed 0255

rally in a shed 0256

rally in a shed 0257

rally in a shed 0258


Glued the props under the plywood, this time I have let the plywood find its own slope and the track find its own level on the plywood. The props have been fixed with grab adhesive pushed just into place so as not to change the lay of the plywood. The front edge has been filled with a solid piece of wood. Instead of forcing the track down on the plywood with hot glue I've used grab adhesive to glue and fill the gap between track and plywood which will hopefully keep the track smoother. And all weighted down till the glue sets.


rally in a shed 0274

rally in a shed 0275

rally in a shed 0276

rally in a shed 0277

rally in a shed 0278


Gave the track a good testing with all cars and and this part of the track is driveable with all the cars in both directions.

This time I have fixed wallboard tape (self adhesive scrim) in place before I plaster the borders which is what I should have done first time and this will hopefully allow me to build up some hills and with luck a rock face up to the tunnel entrance. The tape does not go all the way to the baseboard at the curve end so it will have a slope at the bottom following the slope of the track. Don't know if the tape will hold together when I start plastering it but if it does come apart at the bottom it doesn't really matter as I can leave it level or just build the plaster up to give the same effect.

I've also glued the MDF border in place around the bend at the bottom of the climb. This gives me a nice flat area for the "road" to continue straight on at the bottom of the hill and extends the width of the track around the bend and before the track here was right on the edge of the baseboard. Also taped up this part of the track ready for plastering.


rally in a shed 0279

rally in a shed 0280

rally in a shed 0281

rally in a shed 0282

rally in a shed 0283

rally in a shed 0284

rally in a shed 0285


First coat on the foam for the FRocks and while at it I re-did all the plaster I had to break away to change the track, tried to get the borders as smooth as possible this time so less sanding. And covered all the tape with a basecoat of plaster. Tried putting a thicker coat on but the tape moved about to much so a thin coat to set the tape in place. The MDF has been glued in place for the road in the tunnel.


rally in a shed 0289

rally in a shed 0290

rally in a shed 0291

rally in a shed 0292

rally in a shed 0286

rally in a shed 0287

rally in a shed 0288

rally in a shed 0293

rally in a shed 0294


The plaster on the FRock foam is now dry, didn't think the foam would still be so flexible - hope I'm doing this right.Anyway time for a second coat of drywall adhesive which I thought I would tint with a buffy yellow colour as seen on the glove here (not the colour in the jar). Don't know what colour it's going to dry but as you will see it turned out to be a green colour when mixed in the plaster. I mixed it so that it was just about brushable but still thick enough to cove some of the small gaps and holes. I thought I had covered all the first coat of plaster but the photos have shown up lots of missed spots. I've been applying the plaster with a very cheap nylon brush, supermarket special 4 assorted for £1, and as you can see in the side and 'hole' photos the bruch leaves some nice marks in the plaster. As long as the tape isn't showing through anymore on the side and 'hole' I should get away with just the two coats as the tape was rock hard after the first coat. Will I need to give the foam a third coat, should I give it a third coat anyway??

Also some shots taken at eye level around the track.


rally in a shed 0295

rally in a shed 0296

rally in a shed 0297

rally in a shed 0298

rally in a shed 0289

rally in a shed 0300

rally in a shed 0301

rally in a shed 0302

rally in a shed 0303

rally in a shed 0304

rally in a shed 0305

rally in a shed 0306

rally in a shed 0307

rally in a shed 0308

rally in a shed 0309

rally in a shed 0313

rally in a shed 0314


Was expecting the colour to get lighter just wasn't expecting it to be green. Problem is because I'm using drywall adhesive (mud) and not true plaster it doesn't dry white. In most of the photos it looks white but this is an optical effect of the flash, the closer the plaster to the camera the whiter it appears. Took the last photo without flash and you can see the true colours. As you can see the plaster is a light grey which has turned the yellow green as you can see in the above. I think the yellow may have had a slight green tint to it anyway. Will give the FRock another thin coat, the taped areas don't really need a further coat but if I can get the drywall adhesive to turn yellow I will give them a thin coat.

I'm going to try the bright yellow that was in the photo with the gloves. Could be I need to mix more paint in? At the moment in line with working to a tight budget I'm using up some of my old modelling paints. I may try a very dry mix add as mush yellow as I can find then mix to the required wetness.

Next job was to have another play with that devil expanding foam and this time no major dramas. I filled in the holes under the overpass and it just needs a thin coat of plaster to finish it of.

I also filled the gap I had at the start of the left hand slope before the FRock starts. I tried filling this with live foam but it just kept falling backwards so I let this semi set and filled the gap with more semi set foam, again this now need plastering.

I thought I would have a test with the grey floor paint I had bought for painting the track. This is an acrylic floor paint which was available quite cheap for a while from Aldi. Anyway I tried it on a piece of old track but it didn't like going directly on to the plastic track and was still not dry when this photo was taken sometime later. I also tried it on the plaster around the track as the painted road will be wider than the plastic track in a lot of places. I also painted some of the MDF boarder to give an idea how the road will continue at the bottom of the righthand climb and you can see what a full width painted track and board will look like. Problem is that the paint is way to light and I don't think it looks like concrete even yet alone tarmac and has quite a gloss shine so back to the drawing board on the paint. As I intend to use PlastiKote over the base paint colour I might give dark grey undercoat a try but just wonder if it will mark to easy as it will be very matt and quite porous.

Also some shots taken at eye level around the track.


rally in a shed 0317

rally in a shed 0318

rally in a shed 0319

rally in a shed 0325

rally in a shed 0321

rally in a shed 0320

rally in a shed 0323

rally in a shed 0324


I've also been giving a lot of thought to the problem area on the back slope were the cars keep deslotting and I can see only two options
1) only drive the track in one direction, up the long slope and down the righthand slope but the was not the way the track was intended to be driven most of the time. Some cars, mainly the 1/43rd with magnets can go both ways but some still will not take that section in either direction.
2) Rip all the track on the back slope up along with all the plaster and try to get a smother run to the slope.

It had to option 2 so out with mallet and chisel (and eyes shut) I attacked the plaster and track. First I removed all the plaster around the problem track area and with the track lifted the problem became apparent and was just what I thought it was. To get the ply home it had been cut into 3 pieces and the join between the left and centre pieces was right under the outer lane joint between the two problem bends. The inner lane missed the join which is why I don't think this gave a problem. There is also a change in angle of slope between the left and centre pieces the centre piece being steeper. Even though the joint is supported by a piece of 3x1 under it the slope change is at the joint. I then decided to bypass this area altogether and take the track from the back of the cross roads up to the start of the lefthand loop, so more plaster came up.

Then a new elevated section to fill the gap. I don't know if shows up in the photos but the new section of track is slightly short and most of the joints are quite wide.


rally in a shed 0326

rally in a shed 0327

rally in a shed 0328

rally in a shed 0329

rally in a shed 0330

rally in a shed 0331

rally in a shed 0332

rally in a shed 0333


Then it was time to see if my problem car, the AutoArt Evo, would take this new section ok, both up and down.


Yes it does but this video also shows some of the problems I was having with the Evo and with it's deslotting all over the place.

With the size of the gaps it would mean a lot of filler and wiring each piece of track together. Apart from this one option I have been thinking about is to copper tape over the rails as I have found that some of my 1/32 cars do not like the narrow power rails in the Artin track. I have to keep adjusting the braids to get the cars to run well and I think copper tape would not only cure the problem but also eliminate the power drops that are noticeable with some cars in certain places around the track.

I now had a new climb going diagonally across the track. There was two problems with this first I had removed one of the more technical sections of the track and the gaps between track sections would need a lot of work and each joint would need wiring to ensure electrical contact. So I have tried at least a dozen different layouts and each one had the same problem no matter what the mix of pieces there was always a gap of about an inch or so. So in the end it came back to a modified original layout.

The difference being the I have moved the 2/3 straight from the bottom to the middle of the climb and raised the bottom section to flatten most of the climb out. However I had to remove some Frock at the bottom of the climb as I couldn't get the curves to fit back in there with the foam in place, the Frock further up had been removed when I was trying a straight slope and the foam and polystyrene was in the way of the straight track. So now I've got lots of plaster and foam to replace.


rally in a shed 0326

rally in a shed 0327

rally in a shed 0328

rally in a shed 0329

rally in a shed 0330

rally in a shed 0331

rally in a shed 0332

rally in a shed 0333


Then it was time to see if my problem car, the AutoArt Evo, would take this new section ok, both up and down.

I still wasn't happy with the layout and the EVO was still deslotting unless I has the speed just right so I tried another change. I moved the 2/3 straight towards the top of the slope this put the middle of a curve over the join in the plywood and all that was needed was a small extra piece of ply under that part of the track.

Now it was time to try the cars on the modified track but first I had to do some repairs to the Evo. I Had been trying to pack out the guide to stop it lifting and ensure full guide contact with the track to see if the would help overcome the deslots. While I had the body of I managed to disconnect a wire from the motor. The was soldered back on and the car tried with the body just pushed on to the chassis...

Before I go any further here is a small videos of my other cars on the new layout.


The last car is a Carrera Go!!! Fiat 500 that's just as it came in the set with nothing done to it but it can be run just about flat out all around the track.

Now it has to be remembered that apart from the Cortina no other cars had any real problems with the old layout. The Evo however would not take the rear slope over the plywood join on the rear track in either direction and would also deslot in other places, for instance when going under the overpass in an anticlockwise direction it would deslot in two places on the outer track.

And now the Evo on the new design..


With the body not fixed to the chassis I found the car completely different to drive, all the deslotting problems disappeared almost as if by magic. I know a lot of people recommend loosening the body screws and I did have them undone by about a 1/3 of a turn. In the above videos they have been undone by over a full turn. I can't believe it's all down to the weight of the body and body roll but as you can see it's now great fun to drive.


View on its own (if entry or VIDEO doesn't show)
From Keith
14-05-2020   (18:00:20)

July 2012
Track update
Rally In A Shed 2
Time for repair work on the track and this is the end result, can anyone see the join between the old (Frock) and new (plaster on tape)? I decided that I needed a bit more room between the track and rockface so I decided to remove a lot of the remaining FRock and plaster on to tape as I had on the righthand side of the track. As you can see lots of tape and not a lot of foam anymore. So with tape in place plaster was mixed, the first batch was a bit to wet and didn't do a very good job of covering the tape. The next batch was a lot better and covered the tape quite well. The plaster was being textured as I was applying it as I was using a cheap nylon paint brush to apply and give the diagonal grain effect. I repaired the lefthand loop and then the sloped area in front of the central climb was replastered and all the existing rockface (Frock and foam) was blended into the new plaster.

While I had the plaster mixed I also gave the foam under the underpass a thin coat. I then gave all the vertical rockfaces another thin coat of plaster including the foam under the overpass and the rockface on the righthand side.


rally in a shed 2 0354

rally in a shed 2 0355

rally in a shed 2 0356

rally in a shed 2 0357

rally in a shed 2 0358

rally in a shed 2 0359

rally in a shed 2 0360

rally in a shed 2 0361

rally in a shed 2 0362

rally in a shed 2 0363

rally in a shed 2 0364

rally in a shed 2 0365

rally in a shed 2 0366

rally in a shed 2 0367

rally in a shed 2 0368

rally in a shed 2 0369

rally in a shed 2 0370

rally in a shed 2 0371

rally in a shed 2 0372

rally in a shed 2 0373

rally in a shed 2 0374

rally in a shed 2 0375

rally in a shed 2 0376

rally in a shed 2 0377

rally in a shed 2 0378
Please click thumbs to expand


So now all the green coloured plaster has gone and we have a grey base to work with. The next job is to sand the new plaster around the edge of the track to widern the track width and give som run of areas so the cars can safely side. Hopefully the plaster when dry will be good enough to take some paint with out any further coats.

Plaster has had a week to dry and now I had to sand the plaster down around the track edge.This was the condition of the track after the plaster around the edge of the track has been sanded down. This was the condition of the track after the plaster around the edge of the track has been sanded down. I didn't sand the plaster as smooth as last time but I think it should still be ok. The track was then wiped down with a tac rag.

First thing to get painted was the rock faces with a darkish grey emulsion paint which should have a slight sheen to the finish. This will be the base coat for the grey sandstone cliffs. Next it was brown paint to do the earth areas most of which will probably disappear under grass and trees, again its emulsion paint but matt this time.

Up to now I had been using an Artin power supply to power the track but I'm not sure this has quite enough power for some cars. I have a Multi voltage power suppy that can be set to 5, 6, 7.5, 9, 12, 13.5 and 15V and can suppliy up to 3 amps depending on the voltage It is also a switched power supply. One other problem with the Artin supply was the apart from the Auto Art Evo which has a direction switch on the chassis all the cars run the wrong way around the track. So while the paint was drying I wired the power supply up with a DPDT switch in the power line to the track so I can run all the cars in either direction now.

Then it was time for a couple of experiments, first the track was given a clean with a heavy duty hand cleaning wet rag. This is designed to clean dirt, oil, grease and even paint from hands so I thought I would see how good they are at cleaning the track surface ready for painting.

It is going to be a while I think before the plastic track gets painted so I thought it would be a good idea to lose the red pieces of track and paint in the road extentions going to the edge of the track and may be even the tunnel road. I therefore masked of the slot and rails and painted the track from the cross roads to the red piece at the front. As you can see the red plastic does present one problem in the the slot and plastic in side the rail now stick out like a sore thumb. I think I may have to try giving this area a thin coat of paint.

The road by the lefthand loop has also been painted. The black colour will not be the final finish but I want to see how this Heavy duty paint holds up to being run on. I may also paint the tunnel road and the road at the bottom of the righthand climb. But as I said the is an experiment to see how the paint takes being run on and how good the hand cleaning cloths are at cleaning the track to take paint. The paint certainly appears to have taken to the cleaned surface with no problems.

I keeping with my building to a very tight budget 3 pots of paint testers £1.59 each and it was discount weekend at Homebase and some other offer on the paints so total cost £3.29. I need to get some more brown and grey and some lighter shades of grey for the cliffs. The black and the grey are both a heavy duty emulsion designed for kitchen and bathrooms and are supossed to be hardwearing.


rally in a shed 2 0379

rally in a shed 2 0379 1

rally in a shed 2 0380

rally in a shed 2 0381

rally in a shed 2 0382

rally in a shed 2 0383

rally in a shed 2 0384

rally in a shed 2 0385

rally in a shed 2 0386

rally in a shed 2 0387

rally in a shed 2 0388

rally in a shed 2 0389

rally in a shed 2 0390

rally in a shed 2 0391

rally in a shed 2 0392

rally in a shed 2 0393

rally in a shed 2 0394

rally in a shed 2 0395

rally in a shed 2 0396

rally in a shed 2 0397

rally in a shed 2 0398

rally in a shed 2 0399

rally in a shed 2 0400

rally in a shed 2 0401

rally in a shed 2 0402

rally in a shed 2 0403
Please click thumbs to expand


My general secnic plans are for the section in the middle of the front oval to be trees, with them also running part way up the slope behind this with grass around the edges of this section and earth for the rest of it. The area to the right will be all grass with either a gravel road surface or earth / mud. The rear raised section, righthand climb, left hand outer and all the front oval going on under where the tunnel will be area all going to be tarmac road. From the end of the road the lefthand / rear slope will be gravel. The tarmac and gravel surfaces are going to be finished with Plasti-Cote Stone effect paint (dark grey for tarmac and light grey and or pinkish for gravel which will be what is called MOT type 1 over here, crushed limestone). Part of the chicane at the back will be painted as muddy road as there will be a farm gate leading in to the farm fields beyond, this muddy area will be painted with Johnston Clear to give a shine to the road and reduce the grip here. Any othwer areas that get a muddy effect will also get the clear treatment to give the effect of a slippery surface. The rough area just under the over hang will be coated in Clear as this area will be muddy ( water dripping down from the overhang). I'm also thing of filling the dip inside the righthand loop with water effect of some sort. The way I see it the tarmac road areas need to be finished before the the border areas around it so mud and gravel etc get pulled on to the tarmac but the grave road surface need to be done last as the gravel will spread out in to the borders. Road edge barriers are at the moment looking like being Armeco along the tarmac raised sections. Dry stone walling at the front for the track. Orange safety barrier fencing around both loops. With hedges, straw bails and road cones in other places. The thing also is that at all time it must look ok for 1/32 and 1/43 scale cars so for instence I can't make the road surface to wide but as it's all country lanes or tracks this is not a real problem (narrow lanes in 1/32, wide lanes in 1/43).

I've been thinking about how the area my track is in would have been built up in real life. The base layer is the grey sandstone and on to this a layer of earth would have been built up. In to this is cut the tarmac road which to start with would have had a nice straight edge but as anyone who knows English country lanes will tell you the edge soon starts to break away. The right hand side of the track is a grass field with a gravel track running through it and with this in mind I have given the track here a brown base coat.

Also as you can see I have painted in the road continuation at the loop and from the crossroads going in to what will be the tunnel. I have also done th same on the lefthand loop.The rear slope is in an area were the sandstone has been quarried so the gravel track here is laid directly on the sandstone surface so I have give the track here a base coat of the same grey as used on the rockface.

I also gave the rockface a second coat of grey paint thin this time so it was easier to get in the small cracks in the plaster, I also painted under the overhand. Boy is this a difficult area to paint, I had to work by torchlight to see what I was doing and because of how I make the rockface in the area it is very uneven with lots of holes and pockets. It will need a few more coats of paint before it's ok.

I have also given the slots in the red track pieces a coat of black paint, only a thin wash a couple of more coats will be needed but at least it's looking better.

As I showed earlier I had a go at making some barrier fencing using the plaster scrim tape and I have now obtained some orange paint. Then I cut some BBQ skewers down to make poles, I got three out of each skewer. These I gave a thin wash of green paint so they look like new pressure treated timber. Holes were then drilled in the baseboard and finally the fence was glues to the poles with a glue gun. Due to the flash you can't see the colour of the posts.


rally in a shed 2 0404

rally in a shed 2 0405

rally in a shed 2 0406

rally in a shed 2 0407

rally in a shed 2 0408

rally in a shed 2 0409

rally in a shed 2 0410

rally in a shed 2 0411

rally in a shed 2 0412

rally in a shed 2 0413

rally in a shed 2 0414

rally in a shed 2 0415

rally in a shed 2 0416

rally in a shed 2 0417

rally in a shed 2 0418

rally in a shed 2 0419

rally in a shed 2 0420

rally in a shed 2 0421

rally in a shed 2 0422

rally in a shed 2 0423

rally in a shed 2 0424

rally in a shed 2 0425
Please click thumbs to expand


Gave the rock faces a wash of slightly lighter dark grey first to add a second colour to the surface. Secondly to help cover some of the small areas of bare plaster that the original base coat was to thick to brush into. This also did a much better job on the rockface under the overhang.

Also some general shots taken around the layout.


rally in a shed 2 0426

rally in a shed 2 0427

rally in a shed 2 0428

rally in a shed 2 0429

rally in a shed 2 0430

rally in a shed 2 0431

rally in a shed 2 0432

rally in a shed 2 0433

rally in a shed 2 0434

rally in a shed 2 0435

rally in a shed 2 0436

rally in a shed 2 0437

rally in a shed 2 0438

rally in a shed 2 0439

rally in a shed 2 0440

rally in a shed 2 0441

rally in a shed 2 0442

rally in a shed 2 0443

rally in a shed 2 0444

rally in a shed 2 0445

rally in a shed 2 0446

rally in a shed 2 0447

rally in a shed 2 0448

rally in a shed 2 0449
Please click thumbs to expand


Tracks been masked with yellow Tamyia masking tape, I used a 10mm wide tape and it is wonderful stuff. If you stretch it a bit as you apply it it will follow outside curves with no problem and very little difficulty with inside curves. As it was 10mm wide I had to put two runs down one on each rail but at least there is no cutting to width so made the masking job fairly quick.Then the tarmac areas have been painted with an emulsion paint called Soft Black which is really dark grey. First coat straight out of the pot and second coat thinned with water not quite 50/50. Next will be an over spray with the texture paint.


rally in a shed 2 0450

rally in a shed 2 0451

rally in a shed 2 0452

rally in a shed 2 0453

rally in a shed 2 0454

rally in a shed 2 0455

rally in a shed 2 0456

rally in a shed 2 0457

rally in a shed 2 0458

rally in a shed 2 0459

rally in a shed 2 0460

rally in a shed 2 0461

rally in a shed 2 0462
Please click thumbs to expand


getting ready for spraying the tarmac area of the track so got some paper out and low tack masking tape and covered all the non tarmac parts of the track. Then it was on with a dust mask shake rattle n roll till the paint was mixed up in the can. Long time since I done any spraying so it ended up a bit heavy in places. I just got away with one can of paint, luckly I didn't need too thick a coat of paint although it is thick in some places (hope it doesn't cause any problems).

While the paint was wet it just looked like grey paint but as it dried it changed to a speckled finish.

Then once it was touch dry off with the paper and masking tape. There were a couple of little problems, the areas that I painted with the floor paint are the main problem, the acrylic floor paint hasn't taken to the plaster very well and tends to lift up in sheets.

As you can see the road dosn't follow the slot anymore in a few places.


rally in a shed 2 0463

rally in a shed 2 0464

rally in a shed 2 0465

rally in a shed 2 0466

rally in a shed 2 0467

rally in a shed 2 0468

rally in a shed 2 0469

rally in a shed 2 0470

rally in a shed 2 0471

rally in a shed 2 0472

rally in a shed 2 0473

rally in a shed 2 0474

rally in a shed 2 0475

rally in a shed 2 0476

rally in a shed 2 0477

rally in a shed 2 0478

rally in a shed 2 0479

rally in a shed 2 0480

rally in a shed 2 0481

rally in a shed 2 0482

rally in a shed 2 0483

rally in a shed 2 0484

rally in a shed 2 0485

rally in a shed 2 0486

rally in a shed 2 0487

rally in a shed 2 0488

rally in a shed 2 0489

rally in a shed 2 0490

rally in a shed 2 0491
Please click thumbs to expand


I decided to let the textured paint dry for a couple of days before running on it so yesterday I gave the earth areas another coat of the darker mocha emulsion paint only this time it was a well watered down and was a thin wash. The lighter colour still shows through but I think it looks a lot better with the darker shade over it as it blends in a lot better.

Gave the track a test with most of my cars in both directions and it looks like I am going to have to play about with the weights added to the cars. I removed most of the magnets again and had weighted the cars down to improve grip on the plastic and painted track. As the track does not need a lot of speed I had added quite a bit of weight to all the 1/32 cars except the Mustang. The mustang is still behaving much the same on the textured paint, not so much tail end out but no other problems. The other cars are behaving very differently on the textured paint so it looks like it's time to reduce some weight.

I'm also wondering if the stone paint is the right way to go for the gravel sections. Need the cars to be looser on the gravel sections than on the tarmac sections. But then I do like the look of the stone paint so may use the stone paint and then a few coats of matt or satin or even a mix of the two to fill the texture and reduce the grip of the stone paint. Another possibility is to build up the gravel effect with layers of stippled paint, take a bit of sponge dip it in the paint get it almost dry and then stipple the surface in random patterns and colours. My main worry is if the stone paint goes wrong how easy will it be to remove it.

The next thing to do I am very uncertain about, where the gravel tracks meet the tarmac the gravel track will fade to earth / mud which will need to be pulled onto the tarmac and if I get it wrong I will have ruined the tarmac. So I think I need to paint up a peice of scrap ply and experiment. One idea I have is to get a foam mini roller and cut it down to leave a pair of tyres and dry roller the paint to give the effect of wheel tracks. if this works I could also use this to drag mud over the grave in places, worth a try anyway.

The safety barrier has been "tested" a couple of times now and seems to be working fine.


rally in a shed 2 0492

rally in a shed 2 0493

rally in a shed 2 0494
Please click thumbs to expand


Utility services had been out digging holes in the road and filling with rake and roll tarmac. Why is it every new bit of tarmac has to be dug up.

And had to do a bit more filling.


rally in a shed 2 0495

rally in a shed 2 0496

rally in a shed 2 0497

rally in a shed 2 0498

rally in a shed 2 0499

rally in a shed 2 0500

rally in a shed 2 0501

rally in a shed 2 0502

rally in a shed 2 0503

rally in a shed 2 0504
Please click thumbs to expand


Decided to put the backdrop up and added the dry stone walling to help blend it in to the track. The back drop has been fixed to the shed wall with double sided carpet tape which I hope will prove sucessful. The only possible problem with the tape is that one side is like a normal sticky tape but the other has a low tack adhesive. Luckly for me who ever put the shed up, it was here when we moved in, had lines the inside with hardboard.I have stuck the normal side to the hardboard and the low tack side to the backdrop. The only question is do I go with just an opening in to the fields beyond or install the gate, if I go with the gate I will remove the word Scalextric from it and paint it brown to look like wood. The plan is to put some mud down from the entrance going on the tarmac in one direction and then to coat the area with Johnson Klear to give a wet look to the road. Hopefully this will also reduce the grip over part of the chicane that is here. Although the wall is just printed on sticky paper as the hardboard backing is not flat and there is also a bit of plaster on the hardboard the dry stone wall in not dead flat and does have a bit of life to it. Still got a small portion of backdrop to install on the lefthand side and may come down the side as well.


rally in a shed 2 0505

rally in a shed 2 0506

rally in a shed 2 0507

rally in a shed 2 0508

rally in a shed 2 0509

rally in a shed 2 0510

rally in a shed 2 0511
Please click thumbs to expand
Categories      |     Privacy Policy     |     Copyright Notice     |     Contact Us     |     Links to Forum

 
     © 2014-2023 slotcars66