News
  Found: 504 items      On view: 491 - 500

View on its own (if entry or VIDEO doesn't show)
10-05-2020   (18:00:20)

August 2012
Track update
Rally In A Shed 2
Painted the gate which now looks like wood, I've also removed the 'Scalextric' from it and made the wall taller.


rally in a shed 2 0521

rally in a shed 2 0522

rally in a shed 2 0523
Please click thumbs to expand


I've been playing with the cliffs and colours. I've tried lots of different shades of grey and I'm now on about my third mix. Can't say I'm completely happy but I think this will be it, for the moment anyway.The colours used are a mix of matt and gloss and everythink has had a coat of the base colour was a almost water wash to blend it all in. Some of the rust and stain marks have been just let to run don the cliff face.


rally in a shed 2 0512

rally in a shed 2 0513

rally in a shed 2 0514

rally in a shed 2 0515

rally in a shed 2 0516

rally in a shed 2 0517

rally in a shed 2 0518

rally in a shed 2 0519

rally in a shed 2 0520
Please click thumbs to expand


Ok we had a bit of trouble in the old quarry the other night, someone came and fly tipped a load of tyres. So we put them to use.


rally in a shed 2 0524

rally in a shed 2 0525

rally in a shed 2 0526
Please click thumbs to expand


Get 50 tyres with a black plastic sheet for £4.99, designed for farm scenery, the tyres are to hold the black trapaulin down. Don't know final use of them yet.

Also had the structural engineer on site and had to reinforce the underside of the overhang. Had to build a couple of concrete columns and install a couple of I beams. Got away with setting it in to the cliff face at one end (the rocks here are only foam so could just push the beam in to the foam). Now just need painting, looks like the rust will be coming out again.


rally in a shed 2 0527

rally in a shed 2 0528

rally in a shed 2 0529

rally in a shed 2 0530

rally in a shed 2 0531

rally in a shed 2 0532

rally in a shed 2 0533

rally in a shed 2 0534

rally in a shed 2 0535

rally in a shed 2 0536

rally in a shed 2 0537

rally in a shed 2 0528
Please click thumbs to expand


I've given the sandstone a matt coat, The only problem is that the matt coat as enhanced the colours which isn't to much of a problem except for the rust areas. As you can see the flat coat as darkend the rust colour to a brown so I may have to re do these areas. However the general effect is much better.


rally in a shed 2 0539

rally in a shed 2 0540

rally in a shed 2 0541

rally in a shed 2 0542

rally in a shed 2 0543

rally in a shed 2 0544

rally in a shed 2 0545

rally in a shed 2 0546

rally in a shed 2 0547

rally in a shed 2 0548

rally in a shed 2 0549

rally in a shed 2 0550
Please click thumbs to expand


The Girders under the over hang have been painted, see above. Two thick uneven coats of black emulsion to represent years of bitumen paint beung apply and still the rust comes through. Just need to find a good 'concrete' colour for the support columes and also for the road under the overhang.

I tried a little bit of white highlighting but probably did it a little bit to lightly. Also I've added to the rust, this was done with lots of thinners and a little of the rust weathering powder and was just alowed to run down the rock face.


rally in a shed 2 0551

rally in a shed 2 0552

rally in a shed 2 0553

rally in a shed 2 0554

rally in a shed 2 0555

rally in a shed 2 0556

rally in a shed 2 0557
Please click thumbs to expand


I've also painted the slot to match more or less the the track colour and as you can see I'm also doing a test with the copper tape. The tape width is just about right as it covers the rail and goes to the edge of the slot. I tried this light grey for the concrete road but it doesn't look right.


rally in a shed 2 0558

rally in a shed 2 0559

rally in a shed 2 0560

rally in a shed 2 0561

rally in a shed 2 0562

rally in a shed 2 0563

rally in a shed 2 0564

rally in a shed 2 0565
Please click thumbs to expand


Started with another go at the concrete road suface under the overhang. I like the final result. It's been done the wrong way to normal, a alight grey and the darker grays dry brushed on top. Also a mixture of weathering powders mixed into the original light grey base colour. I Used both the light and dark rust, earth and soot.

Also put the copper tape on the front loop of the track. What a pain that was the tape kept breaking, one run under the overhang has about six joins in it. The difference it makes to the performance of the cars is massive.


rally in a shed 2 0566

rally in a shed 2 0567

rally in a shed 2 0568

rally in a shed 2 0569
Please click thumbs to expand


Next was some more painting, lots of different shades of green where the flock is going and on the top edge of the cliffs. Don't know if I will leave this as painted or add flock.


rally in a shed 2 0570

rally in a shed 2 0571

rally in a shed 2 0572
Please click thumbs to expand


And talking of flock put some green ground cover down and flock over the top. My first attempt and this so will have to see what it's like when the top coat of PVA is dry. Next will be some bushes, hopefully, and some plants. Then it will be time to try to make some trees, But need to get the gravel part of the track painted before the trees get planted.


rally in a shed 2 0573

rally in a shed 2 0574

rally in a shed 2 0575

rally in a shed 2 0576
Please click thumbs to expand


The PVA holding the grass has now dried and to my great suprise its all fixed down and no loose bits.

So onward and I've made a start on the tunnel at last.

Tried a few more bits of scenery, just tempory locations at the moment. may have to get a few more of the smaller rocks but nothings set in stone yet (Pun intened) and they don't need painting.


rally in a shed 2 0573

rally in a shed 2 0580

rally in a shed 2 0585

rally in a shed 2 0581

rally in a shed 2 0582

rally in a shed 2 0583

rally in a shed 2 0584
Please click thumbs to expand


Tunnel entrance is on hold again as my first idea has failed.

I've final finished or so I thought the painting of the track. I got some Gotham Grey Plastikot and have now sprayed the gravel areas of the track.Used the Taymia masking tape again to mask the railsbut as I only had 18mm wide I found that if I masked the outer rail on the curves and then cut the tape against the inner edge of the grove I could mask the inner rail with the trimmed tape and still cover the grove. The paint used for the tarmac was a textured spray paint but this is a stone paint and it appears to come out as small flakes. The one advantage of this is that the base layer colour shows throught very nicely. The edges of the 'gravel' aren't important as I will be drybrushing mud over the gravel in a lot of areas. The only problem so far is that the paint should be touch dry in 2 hours and some 4 hours later it is not touch dry. Where it does appear to be touch dry is still feels and seems very soft. I was already intending to paint the gravel areas with varnish to reduce the effect of the textured surface on the grip of the tyres. This is loose gravel and so should have low grip. It's now looking like the varnish will be need to protect the paint surface yet alone reduce grip.


rally in a shed 2 0586

rally in a shed 2 0587

rally in a shed 2 0588

rally in a shed 2 0589

rally in a shed 2 0590

rally in a shed 2 0591

rally in a shed 2 0592

rally in a shed 2 0593

rally in a shed 2 0594

rally in a shed 2 0595
Please click thumbs to expand


Ok, 24 hours later and the stone paint is dry but it still seems very soft. If you rub on pne of the bare patches you get little flakes coming away. The thickness of the paint doen't seem to matter. So it will be on with a matt clear coat as I don't think the stone paint will take being driven on as is. I don't know if it's just not bonding well with the emulsion paint already been used on the track.As to tracking down klear I had been search for it under the Pledge brand with out a lot of luck but I should have been using it full new name Pleade multi surface wax. It looks like the only supermarket chain stocking it in the UK is Sainsbury's. reading the modeling site it would seem that the new version still works fine as a gloss coat and can still be mixed with acrylic paint and clearcote. The only difference appears to be that you can't use it for fixing decals. I might try coating the stone paint with matt clearcote and then try a mix of matt clearcote and Klear not so much for the sheen but to reduce the grip abit.


rally in a shed 2 0586
Please click thumbs to expand


Just a small update on the plastikote.On the can it said touch dry in 2 houers fully dry in 4 to 6 hours. Well what a load of rubbish. After 2 hours most of the coating was still wet, 24 hous later and it was still soft and could be rubed off. After 48 hours it was hard but I could still rub bits of it away. 72 nhours gone by and it finally seems to be ok having said that I would not try driving on the bare surface.

It's all now been given a first coat of clearcote. Will get a idea how it will look with different finishes as I had to use what clearcoat I had. On the left hand track the front section of the track has flat coat, the middle section is in semi gloss and the rear section if full gloss. On the right hand track it's semi, semi and full gloss. I'd used up most of my flat coat on the rock faces and the local model shop, mainly radio control, doesn't stock any acrylic clear coat only clear gloss enamel.

Still need to get the Pledge Klear, which I will use to fill the surface of the stone paint to give a smooth surface before a final matt coat. This will not only be cheaper than using clearcote but will have the advantage that any bits I miss with the flat coat will look like wet areas I hope biggrin.gif . Depending on what the sufaces look like I may go for a semi matt finish by mixing the klear and matt coat.Need to get this done as then I can get the rest of the copper tape down and start doing some driving.
View on its own (if entry or VIDEO doesn't show)
From Keith
08-05-2020   (20:10:27)

September 2012
Track update
Rally In A Shed 2
As alread siad I coated the gravel sections with clearcoat, a mixture of matt, satin and gloss, in the first photo the mat is on the left, satin on the middle and gloss on the right and the second photo is from left to right gloss, satin, satin. In normal light I couldn't see any difference between the three finishes.


rally in a shed 2 0596

rally in a shed 2 0597

rally in a shed 2 0598
Please click thumbs to expand


And here is one of the goodies from the model shop. They had a whole range of plastic sheets releaf moulded as brick and stone walls and this one as become the tunnel entrance. It needs a dark wash and some highlighting yet. And here's another find, at least it looks like it can support the overhang better than the I beam. Only had a very quick base coat so far more paint and rust needed. Putting the paint on thick in places as it needs to look like it has had years of being painted with bitumen paint just being slapped on.


rally in a shed 2 0599

rally in a shed 2 0600

rally in a shed 2 0601

rally in a shed 2 0602

rally in a shed 2 0605
Please click thumbs to expand


And now to the Klear, which is very thin and although it finds it own levels it also flows and runs very easy. This has one problem I haven't seen mentioned any where which is that any puddles dry with a white finish. I've managed to remove most of this but it does mean that I will have to be very carefull when I am using the Klear to produce wet areas as it has to be a thin coat and a few layers to get a good finish. The gravel areas of the track have now had one coat of clearcoat and three coats of Klear, each one a bit thicker than the last. Even so the coverage has been better and better as the texture has been filled. Even after three coats of Klear the gravel areas don't look glossy.


rally in a shed 2 0603

rally in a shed 2 0604

rally in a shed 2 0606

rally in a shed 2 0607

rally in a shed 2 0608
Please click thumbs to expand


One other use for the Klear is for water running down the rock faces and running down the slope at the base of the cliffs.


rally in a shed 2 0609

rally in a shed 2 0610

rally in a shed 2 0611

rally in a shed 2 0613
Please click thumbs to expand


Need to give the track a test drive now to see what the grip levels are like and then the question will be does it need matt coat over the clear. At least I was able to get some mattcoat from the railway shop.

Althought the finish is gloss because it is still textured it doesn't look gloss. The textured on the gravel area is now a smooth texture if that makes sense. Best way to explaine I think is if you think of the tarmac areas as a medium to fine sandpaper in feel and the stone paint used for the gravel was like a very course paper but not gritty. If you think of that course paper now all clogged up that's the effect but with a slippery feel.

I had to copper tape all of the gravel areas and did most of the rest of the track. My own fault really I should have been a bit more carefull when appllying the clear coat and the Klear. As I knew I would be applying copper tape I wasn't that carefull to avoid the rails. Also the nature of the Klear didn't help, it's almost like water and very free flowing and also finds it's own level. This is very helpfull and flat surfaces but not so much on the slopes. it looks like the Klear flowed down the slopes some what and ran on to the rails, this explaines why the steeper parts are still more textures than the flatter bits. So no power on some sections and it was easier to copper tape than try and clean the rails of the clear. Still got a little bit to tape and I hope I don't run out of copper tape. It's a 30mtr roll and if I remember correctly the track is about 14mtrs and I must have used a least a metre in overlaps when the tape keep breaking. I've found a laying method that works when I'm going from right to left but when I have to change hands to go the other way I can't get it to work and fine it so easy to twist the tape or end up with the backing paper bent back sharply underneath, both of which seem to snap the tape.

Got the rest of the copper tape laid and the gave the new gravel painted surface a real try out. Tried every car 1/32 and 1/42 and no real problems. The cars with strong magnets, Carrea Go, still stick like you know what to a blanket and the other cars with magnets have a little more tail slip. The non magnet cars are now great fun to drive if you like tail slides, can get 90 deg or more with a bit of power applied.

Have to say the the Klear surface is not a problem for grip, even the Artin cars with and without magnets are fine going in both directions - better than on the plain Artin track. The wheel spin I was seeing with the Power Slot Polo I think is just down to the motor. Been running it in both directions and it is so much fun to drive. Going the wrong way around (up the long gravel slope) I can slide the tail a full 90 degs so the car comes onto the tarmac road straight and then the grip from the textured paint kicks in great fun.

The only car having any trouble with the grip levels is the Revell Cortina Mk1 and it doesn't seem to like the extra grip over the plastic track or flat emulsion paint. may have to try taking the edge of the tyres.

Final verdict or the texture and stone paint surfaces - just about right, good grip on the tramac road surface (textured paint) and on the gravel sections apply lots of power and wheel spin apply power to early or to much in the corners and the tail slides out. Which is just what I think you want on gravel. The only question now is how will the Klear stand up to use and only time will tell.

So I'm very happy with the painted surfaces and the copper tape has improved power around the track no end.

So I think I can say track construction is complete and now it's over to the scenery.


I've put some more grass ground cover down and some greenery on the cliffs.


rally in a shed 2 0619

rally in a shed 2 0620

rally in a shed 2 0621

rally in a shed 2 0622

rally in a shed 2 0623
Please click thumbs to expand


Been working on the scenery, first up I've been weathering the gravel and getting rid of the straight edges of the gravel section. This has been done mainly by stippling the paint on and the dry brushing it out and dry stippling it also with a little normal dry brushing and I'm quite happy with the effect. Also mudded up the tarmac by the entrance to the field.


rally in a shed 2 0624

rally in a shed 2 0625

rally in a shed 2 0625

rally in a shed 2 0627

rally in a shed 2 0628

rally in a shed 2 0629

rally in a shed 2 0630

rally in a shed 2 0631

rally in a shed 2 0633
Please click thumbs to expand


Next up is some wooden fencing along the front section of tarmac on the inside. So first of was making the holes for the posts to go in. My idea being to fill the holes with grey silicone and then push the post in to this. If it works the I have a ready made concrete base for the posts. As I don't trust my marking out and cutting I'm building fence insituite. Glue drying on bottom rails.


rally in a shed 2 0644

rally in a shed 2 0645

rally in a shed 2 0632
Please click thumbs to expand


The mud area by the entrance to the field has been given a couple of coats of clear, hopefully this will reduce the level of grip as you go through the chicane as before you could go through this bit fast with no real effect.

While I had the clear out I've also put some on the mud at the end of each gravel section out on to the mud tracks on the tarmac. I've also wetted up the mud around the left hand loop and down the slope towards the rock surface.


rally in a shed 2 0633

rally in a shed 2 0634

rally in a shed 2 0635

rally in a shed 2 0636

rally in a shed 2 0637

rally in a shed 2 0638

rally in a shed 2 0639
Please click thumbs to expand


The use of Klear on its own by the entrance to the field has not worked. It's just not thick enough to fill the texture of the paint, so now I'm using some flat coat to fill the texture then some Klear over that. Hopefully 2 or 3 flat coats will fill the texture.

I also went over all the copper tape with a seam roller. Couldn't beleive how many splits I found in the copper tape, all now retaped. Knew I was going to be tight on tape, could have been worse I've got all of 2 feet left.

I thought I would have a go at seeing how clear silicone sealant would work as water and it was soon clear that it didn't work. One problem it that the silicone is to thick and cannot be got smooth over a large area. This area is just shallow flooded water which has run of the road above, so I might get away with one or more of Embers surgestions, but I don't think I will work for the pond and I will have to go with one form of magic water.


rally in a shed 2 0650

rally in a shed 2 0658

rally in a shed 2 0659
Please click thumbs to expand


Construction of the fence has started using good old coffee stirrers. One thing that again hasn't really worked is the grey silicone for the concrete around the posts so it will need a bit of paint although I may get away with leaving it as is. A crossing point in the fence with some damage to the old wood. And a coat of paint for the fence. As the fence is old and uncared for, the old quarry is now disused so nothing gets repaired or looked after, I've used Tamiya smoke from their clear range to paint the fence. It might need a second coat and was still wet when photoed.


rally in a shed 2 0647

rally in a shed 2 0648

rally in a shed 2 0649

rally in a shed 2 0650

rally in a shed 2 0651

rally in a shed 2 0660

rally in a shed 2 0661

rally in a shed 2 0662
Please click thumbs to expand


The girder and colume has now been fixed in place. Also started to try and remove the silicone which is not easy.

Built a little pier going out into the pond, just needs a fisherman at the end and a little idea for the far lefthand corner. Nothing fix in this corner yet as there is more background to go up yet.


rally in a shed 2 0657

rally in a shed 2 0663

rally in a shed 2 0665

rally in a shed 2 0674

rally in a shed 2 0675

rally in a shed 2 0675
Please click thumbs to expand


When all the track painting was done it became obvious that I had made a big mistake. The more I thought about it the more I reallised that all the gravel areas should have been tarmac and the tarmac loop at the front middle should have been the gravel area. There is no logical reason for this area to be tarmac when you think about it. It also would make a lot more sense if the two roads running down to the crossroads to be tarmac. However at this stage I'm not going to get into re-painting them.


View on its own (if entry or VIDEO doesn't show)
From Keith
05-05-2020   (18:00:20)

October 2012
Track update
Rally In A Shed 2
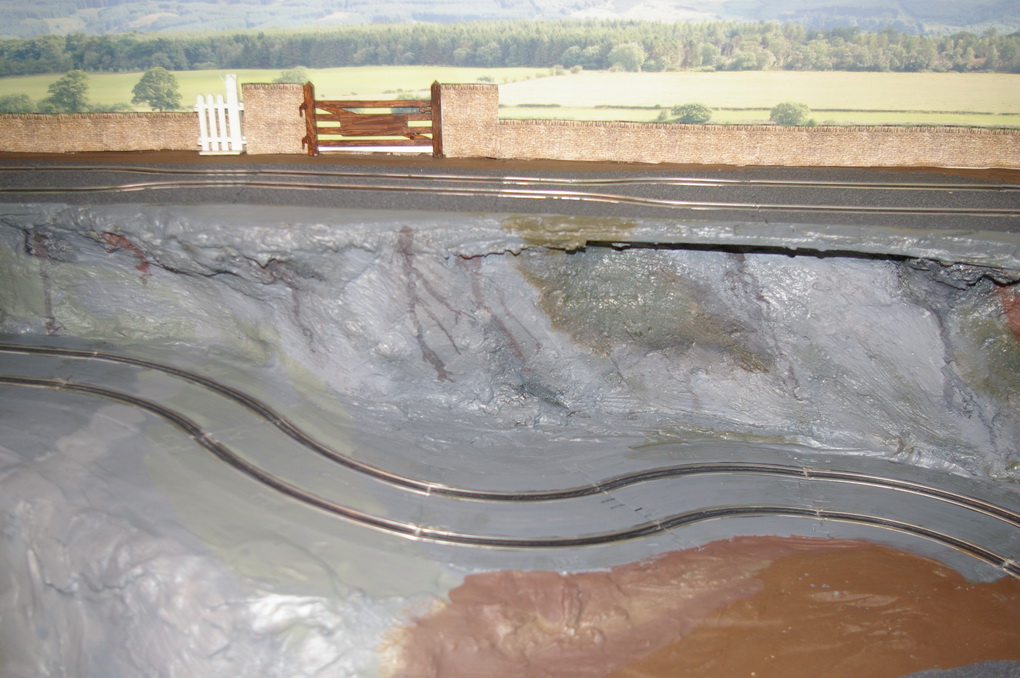
The track by the field entrance has now had one coat of Klear the two coats of matt clear and then a satin clear but the tracks still quite grippy. As an idea to the grip levels it's like comparing 800 to 1200 grip sandpaper. I can see two options at the moment, I could try sanding the surface to get it smooth and the Klear coat or give it at thick coat of brown emulsion to represent a very muddy road and the Klear coat.


rally in a shed 2 0677
Please click thumbs to expand


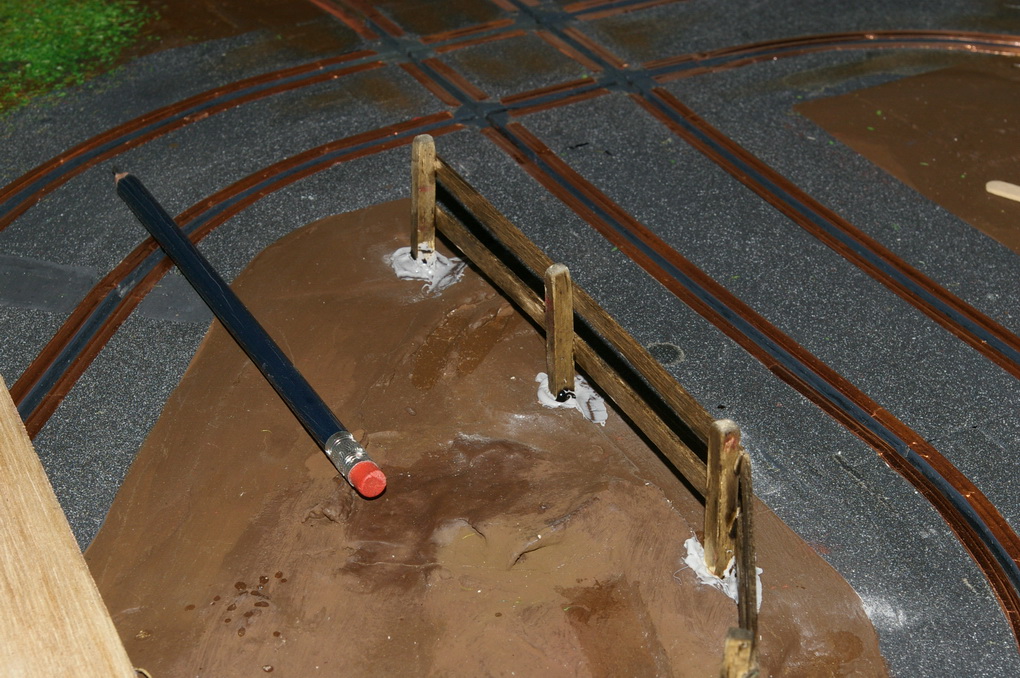
The fence has now had a coat of matt clear to loose the shene from the Tamyia Smoke and I'm happy with the look of the fence and a close up of the step over crossing.


rally in a shed 2 0681

rally in a shed 2 0680
Please click thumbs to expand


I also used the Smoke paint to weather the entrance to the tunnel and found a use for the tyres. Again I like the look of the effect from the Tamyia Smoke again with a coat of matt clear.


rally in a shed 2 0679

rally in a shed 2 0684
Please click thumbs to expand


I've also made some large straw bailes, like the finish but not sure about the size. Done with farm silage golden flock glued to urethane foam with PVA and a spray of PVA over the top which took for ever to dry. Also go some small plastic straw bales in the farm collection I got on the ebay.


rally in a shed 2 0678

rally in a shed 2 0683
Please click thumbs to expand


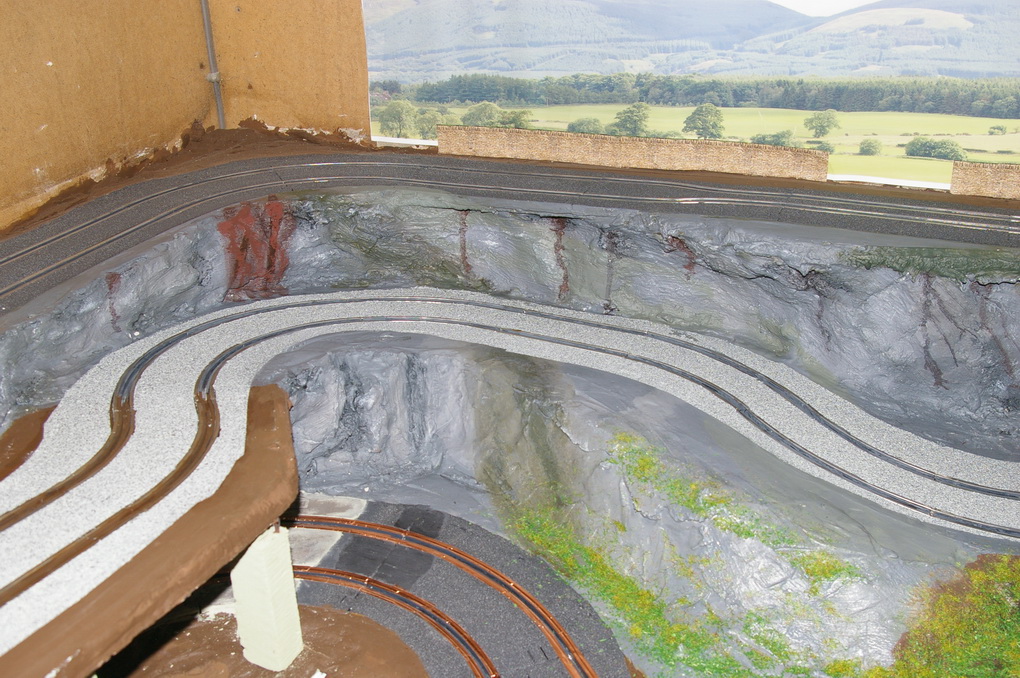
Carried on with the green gound cover around the edge of the track. Also added some fine grass cover to the larger areas. So as not to waste any flock and ground coverand to clean up any over spill I've got a little battery vacuum cleaner (only £3.00) and it works a treat, powerfull enough to clean the slots.


rally in a shed 2 0685

rally in a shed 2 0686

rally in a shed 2 0687

rally in a shed 2 0688

rally in a shed 2 0689

rally in a shed 2 0690

rally in a shed 2 0691

rally in a shed 2 0692
Please click thumbs to expand


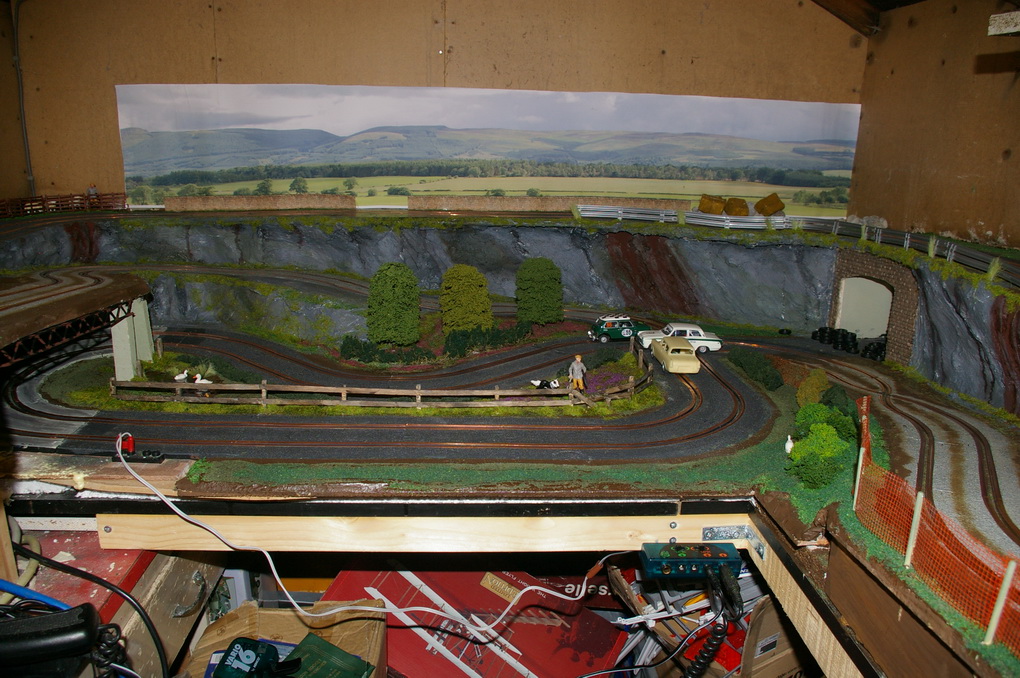
And to finish an over view of the track.


rally in a shed 2 0693
Please click thumbs to expand


Having put down the base layer of grass I've added a layer of thicker flock over it, but left a clear area for a footpath. Also added the flock along the fence and around the posts and columes. Also added some hedges along the back of this area and added some flowers to the area.


rally in a shed 2 0694

rally in a shed 2 0695

rally in a shed 2 0696

rally in a shed 2 0697

rally in a shed 2 0698

rally in a shed 2 0699
Please click thumbs to expand


Up to now I've been using a power supply purchase for Mapin's here in the UK which has an adjustable stepped output from 5V to 15V which is connected to the Artin power connector unit which plugs into the Artin power straight. I've also connected my Ninco controller to an Artin controller plug. The Ninco controller came from the World Rally set and is about 60 ohm which is ok for the Cortina, XK120, Polo and not to bad for the Mustang. However its's way to high for the Mini but I can use an Artin controller for the Mini but it doers get a bit hot. I also have a 2 pole 2 way switch in the wiring between power supply and track to reverse the direction of travel, but in this configeration I don't have any brakes. When I was using the Ninco track I bought a Ninco Verio 16 controller which is an electronic controller which has 16 different settings and includes brakes and can be set up correctly for all the cars. But being electronic it has to be wire correctly or no more controller. So the answer, weil it looks like I won't be selling the World Rally set for a while as it no longer has a power connector. I unscrews the connector unit and cut a few wires, this way I just have to conect the wires that went to the Ninco track rails to the Artin rails and I can screw the unit under the support frame of the track. I can use the Ninco power supply the Vario 16 controller and the power connector unit has direction changing switches built in.


rally in a shed 2 0701
Please click thumbs to expand


Here's a couple of photos of the flowers now everything is dry.


rally in a shed 2 0702

rally in a shed 2 0703
Please click thumbs to expand


The water has finally arrived and the flooded area by the overpass has been done and the first layer of water in the pond. The water need 2-3 days to cure and can only be put down in 3mm layers so the pond will take a little while to do. Will have to see what it looks like when dry, still wet in photos, and it can shrink a bit as well so will have to see what happens.


rally in a shed 2 0704

rally in a shed 2 0705
Please click thumbs to expand


Moving on the the area between the front loop and the gravel climb a few trees have arrived, I got these when I went to the railway shop, quite cheap and not a bad size either.


rally in a shed 2 0707

rally in a shed 2 0708
Please click thumbs to expand


Next addition was amaco barrier on the right hand climb. This has only been hot glues in place which sould be ok as the barrier is not likely to be hit by any cars. The barrier used in Ninco, which I think look good as amaco barrier. I got a lot of ebay from 3 or 4 different sells and a lot had the fixing nibs missing and was no use for my Ninco track , but with the 'posts' cut of at Ninco tack level they are easy to glue in place.


rally in a shed 2 0710

rally in a shed 2 0711

rally in a shed 2 0712

rally in a shed 2 0713

rally in a shed 2 0714
Please click thumbs to expand


Next thing was to put some water in the holes in the ground inside the lefthand loop.


rally in a shed 2 0715

rally in a shed 2 0716

rally in a shed 2 0717
Please click thumbs to expand


Talking about water the product I'm using Jarvis Water should take 2-3 days to dry, now I don't know if it's because it's cold or damp here but the waster is not setting properly. The water use above was more or less set in 3 days but the water by under the overpass took a week to just about set and the water in the pond still has not set after 2 weeks. I may have put in in a bit thicker than the 3 mm maxium but as yet no sign of it setting.

With the water came some field grass and I had a go at setting some in the wet areas.


rally in a shed 2 0718

rally in a shed 2 0719
Please click thumbs to expand


Not happy with the result at this point, have to see what it's like when the water has set.

Next thing was to hide the glue used to fix the barrier in place and this was done with the field grass and flock.


rally in a shed 2 0720

rally in a shed 2 0721

rally in a shed 2 0722
Please click thumbs to expand


Then I carried on around the track with the flock along the top and bottom of the cliffs.


rally in a shed 2 0723

rally in a shed 2 0724

rally in a shed 2 0725

rally in a shed 2 0726
Please click thumbs to expand


While I was at the Railway shop I bought some litchin and used this on the righthand side of the track between the loop and the lower part of the climb. Most of it looks ok but I'm not happy with the very light colour and need to find a way to darken it down abit.


rally in a shed 2 0727

rally in a shed 2 0728
Please click thumbs to expand


A few more photos of the fence and dog walker.


rally in a shed 2 0729

rally in a shed 2 0730

rally in a shed 2 0731

rally in a shed 2 0732

rally in a shed 2 0733
Please click thumbs to expand


I've trimmed the field grass around the wet area and also decided to make this in to a small pond. Think the grass looks better but still no really right.


rally in a shed 2 0734
Please click thumbs to expand


Still can't get the area around the fields entrance right, after 4 or 5 coats of matt clear cote I had to re do the mud effect and then gave it a coat of klear. It should now be a shiny gloss finsh but it's not, although the gritty effect of the paint has be lost the surface still fills rough and isn't at all slippery. Because of this I have decided to get some gloss varnish to coat the area with.

Now the glue is dry I took the vac to the flock and this is the result. Also added some extra bushes in this area but still don't like the light litchen


rally in a shed 2 0735

rally in a shed 2 0736

rally in a shed 2 0737

rally in a shed 2 0738

rally in a shed 2 0739

rally in a shed 2 0740

rally in a shed 2 0741

rally in a shed 2 0742

rally in a shed 2 0743

rally in a shed 2 0744

rally in a shed 2 0745
Please click thumbs to expand


A little photo update of the frack from a drivers view.


rally in a shed 2 0746

rally in a shed 2 0747

rally in a shed 2 0748

rally in a shed 2 0749

rally in a shed 2 0750

rally in a shed 2 0751

rally in a shed 2 0752

rally in a shed 2 0753
Please click thumbs to expand


I've added some grass to the left hand loop and over the green gtound cover on the outside of the loop. Also gone around the rest of the outside of the track with the 2 shades of grass cover and while laying the grass down between the front loop and the down hill section I found a way to darken the yellow Litchen, by rubbing the grass in to it.

Also added another layer of water to the small pond and set some ducks into the water. When it's dry the 2 ducklings on the edge will be put on the water, I hope that you will still be able to see the reflections of the ducks when the water has dried.

While I was in the art shop getting the gloss varnish I also got some other paints and a bag of heather mix which has been used around the trees. One of the things I bought in the toy shop was some pre made wire branches some of which I have used to make some hedging. Also made a gap in the hedging opposite the footpath on the other side of the road.


rally in a shed 2 0754

rally in a shed 2 0755

rally in a shed 2 0756

rally in a shed 2 0757

rally in a shed 2 0758

rally in a shed 2 0759
Please click thumbs to expand


Fitted the power connector from the Ninco track in place under the track.


rally in a shed 2 0764
Please click thumbs to expand


And heres a nice view across the track and 3 general views of the whole track as it is now.


rally in a shed 2 0765

rally in a shed 2 0760

rally in a shed 2 0762

rally in a shed 2 0761
Please click thumbs to expand


One last thing I got at the toy shop was some wire trees to which I have glued some follage. These are supposted to be weeping willows but I think I may have used too dark a colour and and they could really do with a lot more branches. These will be going around the pond when the water has dried and hopefully will look better when in place.

I was not happy with the look of the Weeping Willows so I tried something different with them. First I cut up some of the light field grass I have in to small peices and with this I mixed some loose fibers from the course flock. The flock has a mix of a couple of light greens and a darker green. I dipped the branches in watered down PVC and the into the new mixture.


rally in a shed 2 0767

rally in a shed 2 0768

rally in a shed 2 0769

rally in a shed 2 0770

rally in a shed 2 0771

rally in a shed 2 0772

rally in a shed 2 0773

rally in a shed 2 0774
Please click thumbs to expand


I wanted to put one of the trees on the right side of the pond (you can see the light patch of brown where the hole is) but it hid the pond from sight.Another problem is the the trees are dropping bits of fibre but I don't want to spray the trees with PVA as I don't want to flatten the fibres. I might have to get some hair spray and try that. You can see the dropped fibres in the photos and another problem is that althought it appeared to be dry the water seems to have a tacky surface and the fibres are sticking to it.

Talking of water the water in the main pond has now set althought this also has a tacky finish to it. It needs a few more layers yet but I may leave this for a while as the weather has turned chilly here.

View on its own (if entry or VIDEO doesn't show)
From Keith
28-02-2020   (15:33:09)

The story of 1970's
Slot car racing to the max
My school's slot car club and Wonderland Raceway


View on its own (if entry or VIDEO doesn't show)
27-03-2020   (12:23:58)

November 2012
Track update
Rally In A Shed 2
Ok not much happening at the moment as the weather has turned a bit chilly and there is no heating in the shed, It never quiet gets to freezing in there as we have a freezer in there and the heat from it just keeps the temprature positive.


rally in a shed 2 0780

rally in a shed 2 0781

rally in a shed 2 0782

rally in a shed 2 0783

rally in a shed 2 0784
Please click thumbs to expand


Hair spray seems to have done the trick with the willow trees without any effect on the look of them.

As it happens I don't think the tree bits on the water is a major problems as this would be a fairly stagnent pond so bits floating in it I think only adds to the effect. It's just a shame that you can no longer see the reflections of the ducks in the water.

When I first started the track the idea was for it to be for 1/32 and 1/43 scale cars which is why there are no buildings, however for various reasons the track as become just 1/32 scale. Part of the reason being that I haven't really got on with the 1/43 scale cars and some of the scenery added does not match 1/43 scale.

Another ideal was to keep cost to a minimum and working at a builders merchants helped with the basic build and landscaping. Most of the track came from ebay and a special offer at Argos. I have spent more on scenic items that I would have liked but I have taken the easy option a few times. With the cost saving in mind the latest addition to the track, some more barrier has been done for less the £1. I had to buy the wood for the posts but the 'steel rails' are painted BBQ skewers, and I have to say that I really like the look of this barrier.


rally in a shed 2 0775

rally in a shed 2 0776

rally in a shed 2 0777

rally in a shed 2 0778

rally in a shed 2 0779
Please click thumbs to expand


One thing that has surprised me is that with the cold the level of grip from track and tyres seems to have increased. The cars are kept in the shed so they have cold tyres which I assume are all rubber based so should have little grip while cold, but I am finding that unless I accellerate the cars slowly the level of grip seems way to much from the textured paint (tarmac) and the rear wheel jump and bounce. The only thing I can think is that the paint is more solid in the cold giving a rougher surface and therefore high grip for the tyres. I am assuming the the paint has a plastic base and therefore its hardness and flexability changes with the temprature of the shed.

Nothing else has happened this month as it's been just to cold in the shed

View on its own (if entry or VIDEO doesn't show)
From Keith
21-03-2020   (18:00:20)

December 2012
Track update
Rally In A Shed 2
Finally got my package from China, after four weeks they resent the goods and the arrived in two weeks.

Part of the package was some trees which I have used to line the righthand side of the track. I've also painted the wall on this side as well.


rally in a shed 2 0785

rally in a shed 2 0786

rally in a shed 2 0787

rally in a shed 2 0788
Please click thumbs to expand


About a week ago I topped up the water in the righthand pond and it seems to be setting ok but now it's starting to lift or delaminate, I can't tell which yet, not good.

Due to the weather and work on the '"Winter Layout" nothing else got done this month.

View on its own (if entry or VIDEO doesn't show)
From Keith
18-03-2020   (18:00:20)

The story of 2011
The start of my interest again in slot cars


View on its own (if entry or VIDEO doesn't show)
From Keith
12-03-2020   (18:00:05)

December
Track update
In December I decided to finally make use of the Ninco World Rally set that I had bought a few years before. Well at least over Christmas and the New Year.


Latest Arrivals
When asked what it wanted for Christmas I said a couple of slot cars and settled on two of my favourite Sixties road cars.

So Christmas day I became the happy owner of a Pioneer Ford Mustang.


and a Revell Lotus Cortina Mk1.


View on its own (if entry or VIDEO doesn't show)
From Keith
09-03-2020   (18:00:20)

The story of 2005
I but a slot car set


View on its own (if entry or VIDEO doesn't show)
From Keith
05-03-2020   (18:00:05)

2005
Bought a Ninco World Rally set , I saw it while browsing on eBay and bought it on a whim as I thought it would be perfect for a lone slot racer with it's two rally loops.


It arrived a few days later and after playing with it a few times and trying a few different layout designs it was boxed up an put away.

Next time it came out was 2011...
Categories      |     Privacy Policy     |     Copyright Notice     |     Contact Us     |     Links to Forum

 
     © 2014-2023 slotcars66